Tuesday, January 5, 2021

Managing an Object Store on ZFS

 This blog post will cover how to access the object store on ZFS to create buckets and upload files. For S3, I am using Cloudberry, which I downloaded here. For OCI, I am using the OCI cli tool.


S3 access to ZFS

This is the easiest, since the S3 object store on ZFS is an S3 compatible interface.

In cloudberry add a new account and use the following for input.


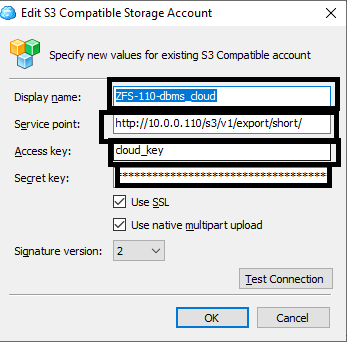
Note that you need to enter the 4 fields above.

  • Display Name -- What you want to call the new account entry
  • Service Point  -- This is the ZFS interface for S3 in the form of 
HTTP://{the IP of the ZFS}/s3/v1/{share name}
  • Access Key  -- This is the name you gave the S3 access key, when you added it to the ZFS
  • Secret Key   -- This is the long string of characters that was returned by ZFS when you created the key.
That's it ! You can now use cloudberry to create buckets, upload files, sync object stores etc.


OCI access to ZFS

Install the CLI

Like the Oracle cloud, there is currently (as of me writing the blog post), no GUI tool like cloudberry that will connect to an OCI object store.  When connecting to the Oracle cloud, you can access the OCI object store through the S3 interface, but this is not possible on ZFS. Both the OCI and S3 object store are independent and cannot access buckets etc. in the other object store.

In order to access ZFS through OCI we start with downloading the OCI cli tool. Documentation on how do this can be found here.

In my install, I took the easy route  (and since I had a Ubuntu client with root access to play with). I installed it directly using "sudo pip install oci-cli"

Create a config file.


Once you have the OCI cli installed we need to set up a configuration file to be used.
The default file is ~/.oci/config, but this location can be changed when using the command if you access multiple OCI installations.

This is the contents of my file.


1
2
3
4
5
6
7
[DEFAULT]
user=ocid1.user.oc1..oracle
fingerprint=1e:6e:0e:79:38:f5:08:ee:7d:87:86:01:13:54:46:c6
key_file=/home/oracle/opc/oracle_private.pem
tenancy=ocid1.tenancy.oc1..nobody
region=us-phoenix-1
pass_phrase = oracle

Now to walk through each line.

1. This identified the entry. Since the config file can contain entries for multiple OCI locations, this entry is identified as the default entry to use (If I don't specify one).
2. This is the user ID.  Since I am using ZFS, the format is "ocid1.user.oc1..{zfs user}"
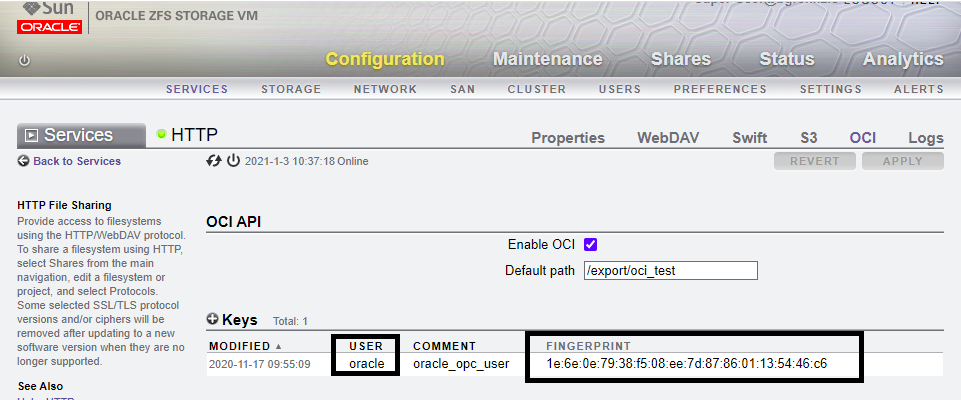
3. This is the fingerprint. I mentioned in the last blog post that this will be needed. This fingerprint identifies the API public_key entry on ZFS to use when matching the private API key being sent
4. This is the private key file. This contains the private API key that matches the public key that was added to the ZFS.
5. This is unimportant to ZFS, but is required to be set. Use the entry above.
6. Like #5. this is not used by ZFS but is needed by the OCI client.
7. This is optional. If the API private key was created with a pass_phrase, this the pass_phrase that matches the private key.


Create a bucket on OCI.

Almost there now ! We have everything in place for authentication, and we are ready to create an OCI bucket on ZFS for storing data.

The command is 

oci os bucket create --endpoint {OCI object store location} --namespace-name {location on the object store} --compartment-id {compartment in OCI} --name {new bucket name}


Now let's walk through what the parameters will be for ZFS

--endpoint               -> For my ZFS appliance, it is the url + oci
--namespace-name  -> This is the share on the ZFS.  "/export/short" in my config.
--compartment-id    -> This is also the share on the ZFS.  "/export/short" in my config.
--name                     -> the name of the bucket I want to create.

For my configuration below is the command and the output.. I now have a bucket created, and I am able upload data !


oci os bucket create --endpoint http://10.0.0.110/oci --namespace-name export/short --compartment-id export/short --name mynewbucket 

{
  "data": {
    "approximate-count": null,
    "approximate-size": null,
    "compartment-id": "export/short",
    "created-by": "oracle",
    "defined-tags": null,
    "etag": "a51c8ecbf1429f95b446c4413df9f494",
    "freeform-tags": null,
    "id": null,
    "is-read-only": null,
    "kms-key-id": null,
    "metadata": null,
    "name": "mynewbucket",
    "namespace": "export/short",
    "object-events-enabled": null,
    "object-lifecycle-policy-etag": null,
    "public-access-type": "NoPublicAccess",
    "replication-enabled": null,
    "storage-tier": "Standard",
    "time-created": "2021-01-05T16:15:05+00:00",
    "versioning": null
  },
  "etag": "a51c8ecbf1429f95b446c4413df9f494"
}


ADVANCED TOPIC -- SSL with OCI CLI


Now let's say I want to encrypt my connections to OCI and use the HTTPS server available on ZFS.
First I need to create a file containing the certificate. I can get the certificate by executing.

openssl s_client -showcerts -connect 10.0.0.110:443

This returns a lot of information, but within the output I can see the certificate, and I can copy and paste into a file.

Certificate chain
 0 s:CN = 10.0.0.110, description = https://10.0.0.110:215/#cert
   i:CN = 10.0.0.110, description = https://10.0.0.110:215/#cert
-----BEGIN CERTIFICATE-----
MIIDXDCCAkSgAwIBAgIIW+387wAAAAIwDQYJKoZIhvcNAQELBQAwPDETMBEGA1UE
AwwKMTAuMC4wLjExMDElMCMGA1UEDQwcaHR0cHM6Ly8xMC4wLjAuMTEwOjIxNS8j
Y2VydDAeFw0wNjAyMTUxODAwMDBaFw0zODAxMTkwMzE0MDdaMDwxEzARBgNVBAMM
CjEwLjAuMC4xMTAxJTAjBgNVBA0MHGh0dHBzOi8vMTAuMC4wLjExMDoyMTUvI2Nl
cnQwggEiMA0GCSqGSIb3DQEBAQUAA4IBDwAwggEKAoIBAQCyfgnTMtxgPEtrmCpB
J4gHngdqpRQWnUXA/OtWGymXME/+gAd5Q/8LZ74VpkHIwk3T7z/+tJVgL1HFmmbi
ZRSsXfSUgOBHm0doPn3VGbykz5MHWm3HHwjpPwvVhyeuVEkUfs/yiZ9B1WZrkr6U
ePNKlkbdL1VN5q2zuLdJ7+jn3HIiSS9j10i7HQVFEuzUAGdt3q0rp2MwaxSP6+cZ
hzMaI5IGBHuVkw2fGX1RdDB6uZpFEEhRSHURr5/3d+UgOprkMKp8Wph3kH0E2Nha
tGpSn2/6NM/Up/nDjfu2Dxm9A2aCwC56ShTckTTxE2HrgfSE9r/vEnkJEdSemH+X
9BuRAgMBAAGjYjBgMCYGCWCGSAGG+EIBDQQZFhdBdXRvbWF0aWNhbGx5IGdlbmVy
YXRlZDA2BgNVHREBAf8ELDAqggoxMC4wLjAuMTEwhwQKAABuhhZodHRwczovLzEw
LjAuMC4xMTA6MjE1MA0GCSqGSIb3DQEBCwUAA4IBAQAqxZk2knSBinWvTADkrvuS
C3vkeLyOLCRwABnGzZV80AAZ3tSVZt2JPXtg8uAVEj29J4VFw/I7HuneGL/faW9q
Qr9h+2WjvoT+m6lIfwELeaomZhkrLmJomGqSP1wfw5jaw3cpt0yOeS4RWUYb9eEe
bTH6laFBtSdbaI/uHslxpJwNRDwn8zBpAWmZk83UQ5CytH37yrFPRoHQWp+OqF+V
GYTPA4drxQ00nuelNfpHWMCjjMr0WxFz5rNJPMOAe2W1Xcr/MM1h04kGVwRtYsC0
4izqKtfiOHt0wMkSbYuSj1tIzdEzjVmxNSS7nv/znrMt+6SsdYQHMmaJ4+wHlJo4
-----END CERTIFICATE-----
---
Server certificate
subject=CN = 10.0.0.110, description = https://10.0.0.110:215/#cert

I want to copy the certificate including the "BEGIN CERTIFICATE" and "END CERTIFICATE" lines into a file. 

I now need to set my environment to see the certificate file and use it. In my case "/home/oracle/opc/wallet_cloud/zfs.cer"

export REQUESTS_CA_BUNDLE=/home/oracle/opc/wallet_cloud/zfs.cer

I can now view the buckets in my object store, and upload files encrypted.

oci os bucket list --endpoint https://10.0.0.110/oci --namespace-name export/short --compartment-id export/short 
{
  "data": [
    {
      "compartment-id": "export/short",
      "created-by": "oracle",
      "defined-tags": null,
      "etag": "a51c8ecbf1429f95b446c4413df9f494",
      "freeform-tags": null,
      "name": "mynewbucket",
      "namespace": "export/short",
      "time-created": "2021-01-05T16:15:05+00:00"
    }
  ]
}


The OCI documentation should give you everything you need to upload/download objects within a bucket.

Managing authentication for a ZFS Object Store

 As promised, I am continuing my blog series on how to work with ZFS as a cloud store.


My first blog post went through the steps of how to configure ZFS as an object store.

This post will go through how to create the authentication keys/secrets to access  Object Store.

OCI/S3 user management

The first thing to do is to create a user on the ZFS that will be used as the owner of the object store.

In my case I am going to use the "oracle" account, and ensure that the GUID is the same as the GUID I use on all my DB servers.


NOTE: Most of the information I used to go through the process was from this document.

Create the user

Start by logging into the web interface for the ZFS appliance and navigate to Configuration -> users .

Once on this page, click on the + sign next to users to create a new user. In the example, I had already created the Oracle user.


Now on the create user page, ensure the user is a "local" user, and the "User ID" is the same as the GUID I normally use for Oracle. After entering the information, click on "ADD" in the upper right hand corner to add the user.


Change share ownership

Now that I have the "oracle" user created, I am going to change ownership on my share that will be my object store.

In order to do this, I am going navigate to Shares -> SHARES . I see my object store share and highlight it and click on the pencil icon to edit the share.


I am now on the detail screen for my share, and I navigate to the Shares -> SHARES -> Access page.
On this page, I change the user to be Oracle, and ensure the permissions are open enough. Once this change is made click on the apply button in the top right hand corner.


OCI Authentication.

Create the API keys

Now we need to add to add the API key to authenticate the user to the Object store.
In the case of an OCI bucket, authentication is performed by using an X.509 certificate.
This is the same authentication used for an OCI bucket in the Oracle Cloud.

Instructions on how to create an API signing key can be found here.

In my case I used the linux command instructions, and the openssl command to create both a private and public key.  When completed, I had 2 files.

/home/oracle/opc/oracle_public.pem  
        -----BEGIN PUBLIC KEY-----
        sdfa23
        ....
        -----END PUBLIC KEY-----

/home/oracle/opc/oracle_private.pem  
       -----BEGIN RSA PRIVATE KEY----
        5dfgsret345
        ....
        -----END RSA PRIVATE KEY-----

Add the API key

Now that we generated the Keys, lets add them to the share so we can access the OCI object store.

We start by going to Configuration-> Services -> HTTP. Click on HTTP to bring up the next page.


On this page, we want to go to the OCI tab and add a new key.


On the "New Key" window that popped up, add the Oracle user, and paste in the public key. Once everything is entered click on add to create the key.


Once added make note of the Fingerprint.


S3 Authentication.

Create the Secret.

Unlike OCI, S3 authentication is done through a "secret".  The use of a "secret" is similar to the idea of a Key and a Passcode. You create a new access  key for the user, and you then you are provided a long string that is the "passcode" for this key.

Like creating API key for OCI, we start by going to the HTTP service.


This time we go the S3 tab under HTTP and click on the + sign to add a key.


Enter the oracle user, and give your key a name. Once complete, click on ADD to create the key.


Now you will see a window with the Secret Key.
SAVE THIS KEY. you will not be given this key again. You can copy and paste it, but better yet, save it in a file.


Authentication for S3 and OCI.


When you completed both of these actions you will have 2 authentication pieces that we will use to create buckets and access the object store in future blog posts.

S3 - You have an "ACCESSS_KEY" and a "SECRET_KEY" that will be used.

OCI - You have a file containing the private_key, public_key, and the fingerprint associated with the public_key to identify it.


Wednesday, December 2, 2020

Advanced Compression and TDE

 This blog post details what happens when you utilize ACO to mitigate the effects of TDE.


I started researching this topic as I thought about what happens when ACO is implemented on a table.

The first thought on Implementing ACO is that it will mitigate the effects of TDE by reducing the size of the data, and thus reducing the size of the backup RMAN creates (without using RMAN compression). Most backup strategies use compression, and TDE data will not encrypt. Implementing ACO to reduce the database size, reduces the backup size and mitigates the effect of TDE.

This all sounds good, and at first glance makes sense.

Of course there is a lot more to ACO, then just mitigating the loss of compression on my backup strategy.

  • The size of the level 0 is smaller, thus my restore time can be reduced AND the amount of storage needed for my Level 0 is lessened.
  • I am reading fewer blocks for the same amount of data. Less physical reads typically means faster queries (that perform disk reads).

If I am able to achieve 2x compression through ACO, my backup size is reduced to be 1/2 the size it would be without ACO right ?

Well .... There are few things to think about.

First - Indexes may be a large part of your database. I have seen applications where the indexes take up more space than the data itself.  Also, you can only compress indexes that have more than 1 column. In a multi-column index, the prefix columns can be compressed. Single column indexes cannot be compressed.


Second- Let's take a close look at how ACO works with my table. What happens with my level 0 backup is pretty clear. I would expect to get at least a 2x compression ratio. What I wanted to explore is what happens to my daily incrementals and archive logs ?

Here is the documentation that best describes it.  Below is a picture that shows what happens with OLTP compression. This is where I looked close at.


What caught my eye in this is that the block starts out initially uncompressed. As the block gets full, a background process will compress the rows and the resulting block will be compressed. The thoughts I had were

  • That's great for my incremental backup size.  More data in each block means less blocks to backup.
  • With my redo, the row is initially inserted in the block at the current scn, and the batch process then changes the block and that row is moved. The movement of the row needs to be captured in the redo, resulting in more redo.
Now to put this to the test and see what happens.

I started by creating my own copy of DBA_OBJECTS and continued to replicate the data until it was ~ 100MB. This seemed like a good size to work with. In order to facility updates to this dataset (since there were duplicates), I added a column that is the rownum. This gives each row a unique key from 1 to the number of rows.

My table is named "bgrenn.myobjects"
My tablespace is ENCRYPTED_DATA and was created with the ENCRYPTION clause.

Step 1 - I created a table to hold the results of the changes to analyze.  Below is the definition (if you want to follow along at home).

create table bgrenn.tests(test_type varchar(10),
              test_table varchar(20),
              test_number integer,
              test_start_seq# number,
              test_end_seq# number,
                          rows_affected number,
                          blocks_changed number,
                          incr_size number,
                          archive_size number,
                          total_size number) tablespace encrypted_data;
Step 2 - I created 2 empty tables in the encrypted tablespace. One defined with OLTP compression, one without.

create table bgrenn.uncompressed tablespace encrypted_data as select * from bgrenn.myobjects where 1=0;
create table bgrenn.compressed tablespace encrypted_data  ROW STORE COMPRESS ADVANCED as select * from bgrenn.myobjects where 1=0;

INSERTS


Step 3
- Execute my procedure to insert into the uncompressed table committing every 100 rows. At the end of the procedure I insert into my "tests" table the information about this action.

DECLARE
   TYPE mytest_cur IS REF CURSOR;
   commit_count number := 0;
   insert_count number := 0;
   start_seq_number number;
   end_seq_number number;
   blocks_changed number;
   start_scn number;
   archive_size number;
  intable bgrenn.myobjects%ROWTYPE;
  CURSOR c1 IS SELECT
     * from bgrenn.myobjects;

BEGIN
   OPEN c1;
   execute immediate 'alter system archive log current';
   select max(sequence#) into start_seq_number from v$log;
   select current_scn into start_scn from v$database;
   LOOP
      FETCH c1 INTO intable;
      EXIT WHEN c1%NOTFOUND;
       insert into bgrenn.uncompressed values intable ;
       if commit_count=100 then
     commit;
     commit_count:=0;
     end if;
    commit_count := commit_count + 1;
    insert_count := insert_count + 1;
   END LOOP;
   dbms_output.put_line('# of rows inserted = ' || insert_count);
   execute immediate 'alter system archive log current';
   dbms_stats.gather_table_stats('BGRENN','UNCOMPRESSED');
   select sum(blocks) into blocks_changed from dba_segments where owner= 'BGRENN' and segment_name in ( 'UNCOMPRESSED','UNCOMPRESSED_IDX');
   select count(distinct dbms_rowid.rowid_block_number(rowid)) into blocks_changed from bgrenn.uncompressed where ora_rowscn >= start_scn;
   select max(sequence#) - 1 into end_seq_number from v$log;
   select sum(blocks*block_size) into archive_size from v$archived_log where sequence#>=start_seq_number and sequence# <=end_seq_number;
   insert into bgrenn.tests values('Insert','Uncompressed',1,start_seq_number,end_seq_number,insert_count,blocks_changed,blocks_changed*8192,archive_size,blocks_changed*8192+archive_size);
   commit;
   CLOSE c1;
END;
/

Step 4 - Execute my procedure to insert into the compressed table committing every 100 rows. 


set serveroutput on;
DECLARE
   TYPE mytest_cur IS REF CURSOR;
   commit_count number := 0;
   insert_count number := 0;
   start_seq_number number;
   end_seq_number number;
   blocks_changed number;
   archive_size number;
   start_scn number;
  intable bgrenn.myobjects%ROWTYPE;
  CURSOR c1 IS SELECT
     * from bgrenn.myobjects;

BEGIN
   OPEN c1;
   execute immediate 'alter system archive log current';
   select max(sequence#) into start_seq_number from v$log;
   select current_scn into start_scn from v$database;
   LOOP
      FETCH c1 INTO intable;
      EXIT WHEN c1%NOTFOUND;
       insert into bgrenn.compressed values intable ;
       if commit_count=100 then
     commit;
     commit_count:=0;
     end if;
    commit_count := commit_count + 1;
    insert_count := insert_count + 1;
   END LOOP;
   dbms_output.put_line('# of rows inserted = ' || insert_count);
   execute immediate 'alter system archive log current';
   dbms_stats.gather_table_stats('BGRENN','COMPRESSED');
   select sum(blocks) into blocks_changed from dba_segments where owner= 'BGRENN' and segment_name in ( 'COMPRESSED','COMPRESSED_IDX');
   select count(distinct dbms_rowid.rowid_block_number(rowid)) into blocks_changed from bgrenn.compressed where ora_rowscn >= start_scn;
   select max(sequence#) - 1 into end_seq_number from v$log;
   select sum(blocks*block_size) into archive_size from v$archived_log where sequence#>=start_seq_number and sequence# <=end_seq_number;
   insert into bgrenn.tests values('Insert','Compressed',1,start_seq_number,end_seq_number,insert_count,blocks_changed,blocks_changed*8192,archive_size,blocks_changed*8192+archive_size);
   commit;
   CLOSE c1;
END;
/

Now that we have done our inserts, let's take a look and see what happened.

TEST_TYPE  TEST_TABLE           ROWS_AFFECTED  INCR_SIZE ARCHIVE_SIZE TOTAL_SIZE
---------- -------------------- ------------- ---------- ------------ ----------
Insert     Uncompressed                585640   96075776    282468864  378544640
Insert     Compressed                  585640   50331648    476089856  526421504

I inserted the same number of rows into both tables, in fact I inserted the same exact rows.

When looking at the size of the incremental backup (these will become part of the level 0 backup) the comparison is.
    Compressed      - 50331648    
    Uncompressed - 96075776    
    Compression ratio  1.9X
Perfect ! My incremental backup size of my compressed table size is about 1/2 of that of uncompressed data. This makes up for the loss of compression in my backup.

Now let's take a look at the Archive Log Backup. These will be kept for the retention window.

Compressed        -    476089856  
Uncompressed    -    282468864  
Compression ratio    .60x

Wow, it's less than 1. The archive logs for compressed data is almost double what they are for uncompressed.

Finally let's take a look at the Total Change Backup size.

Compressed        -    526421504  
Uncompressed    -    378544640
Compression ratio    .71x

INSERTS - The daily backup size for inserts is bigger for compressed data.

UPDATES


Step 5 - Execute my procedure to update 1% of the data in  the uncompressed table committing every 100 rows. 


DECLARE
   commit_count number := 0;
   update_count number := 0;
   max_updates number := 0;
   max_rows number := 0;
   random_row number :=0;
   start_seq_number number;
   end_seq_number number;
   blocks_changed number;
   archive_size number;
   start_scn number;
BEGIN
   select current_scn into start_scn from v$database;
   select count(1) into max_rows from bgrenn.uncompressed;
   max_updates := max_rows * .01;
  execute immediate 'alter system archive log current';
   select max(sequence#) into start_seq_number from v$log;

   LOOP
      EXIT WHEN update_count > max_updates;
       select trunc(dbms_random.value(1,max_rows),0) into random_row from dual;
       UPDATE bgrenn.uncompressed SET SUBOBJECT_NAME= OBJECT_NAME WHERE myrownum = random_row;
       insert into bgrenn.myblockchanges select dbms_rowid.rowid_block_number(rowid) from  bgrenn.uncompressed where myrownum = random_row;
       if commit_count=100 then
     commit;
     commit_count:=0;
     end if;
    commit_count := commit_count + 1;
    update_count := update_count + 1;
   END LOOP;
   execute immediate 'alter system archive log current';
   dbms_stats.gather_table_stats('BGRENN','UNCOMPRESSED');
   select count(distinct block_number) into blocks_changed from bgrenn.myblockchanges;
   select count(distinct dbms_rowid.rowid_block_number(rowid)) into blocks_changed from bgrenn.uncompressed where ora_rowscn >= start_scn;
   select max(sequence#) - 1 into end_seq_number from v$log;
   select sum(blocks*block_size) into archive_size from v$archived_log where sequence#>=start_seq_number and sequence# <=end_seq_number;
   insert into bgrenn.tests values('Update','Uncompressed',1,start_seq_number,end_seq_number,update_count,blocks_changed,blocks_changed*8192,archive_size,blocks_changed*8192+archive_size);
   commit;
   dbms_output.put_line('# of rows updated = ' || update_count);

 END;
/

Step 6 - Execute my procedure to update 1% of the data in  the compressed table committing every 100 rows. 

DECLARE
   commit_count number := 0;
   update_count number := 0;
   max_updates number := 0;
   max_rows number := 0;
   random_row number :=0;
   start_seq_number number;
   end_seq_number number;
   blocks_changed number;
   archive_size number;
   start_scn number;
BEGIN
   select current_scn into start_scn from v$database;
   select count(1) into max_rows from bgrenn.compressed;
   max_updates := max_rows * .01;
  execute immediate 'alter system archive log current';
   select max(sequence#) into start_seq_number from v$log;

   LOOP
      EXIT WHEN update_count > max_updates;
       select trunc(dbms_random.value(1,max_rows),0) into random_row from dual;
       UPDATE bgrenn.compressed SET SUBOBJECT_NAME= OBJECT_NAME WHERE myrownum = random_row;
       insert into bgrenn.myblockchanges select dbms_rowid.rowid_block_number(rowid) from  bgrenn.compressed where myrownum = random_row;
       if commit_count=100 then
     commit;
     commit_count:=0;
     end if;
    commit_count := commit_count + 1;
    update_count := update_count + 1;
   END LOOP;
   execute immediate 'alter system archive log current';
   dbms_stats.gather_table_stats('BGRENN','COMPRESSED');
   select count(distinct block_number) into blocks_changed from bgrenn.myblockchanges;
   select max(sequence#) - 1 into end_seq_number from v$log;
  select count(distinct dbms_rowid.rowid_block_number(rowid)) into blocks_changed from bgrenn.compressed where ora_rowscn >= start_scn;
    select sum(blocks*block_size) into archive_size from v$archived_log where sequence#>=start_seq_number and sequence# <=end_seq_number;
   insert into bgrenn.tests values('Update','Compressed',1,start_seq_number,end_seq_number,update_count,blocks_changed,blocks_changed*8192,archive_size,blocks_changed*8192+archive_size);
   commit;
   dbms_output.put_line('# of rows updated = ' || update_count);

 END;
/

Now that we have done our updates, let's take a look and see what happened.

TEST_TYPE  TEST_TABLE           ROWS_AFFECTED  INCR_SIZE ARCHIVE_SIZE TOTAL_SIZE
---------- -------------------- ------------- ---------- ------------ ----------
Update     Uncompressed                  5857   37699584      5346816   43046400
Update     Compressed                    5857   30203904     11993600   42197504

I updated the same number of rows into both tables.

When looking at the size of the incremental backup (these will become part of the level 0 backup) the comparison is.
    Compressed      - 30,203,904         
    Uncompressed -  37,699,584      
    Compression ratio  1.2X

Perfect ! My incremental backup size of my compressed table size isn't much different than that of uncompressed data. This isn't surprising. with a 1% change rate, the same block might not be updated more than once. Same number updates = same number of blocks backed up.


Now let's take a look at the Archive Log Backup. These will be kept for the retention window.

Compressed        -    11,993,600   
Uncompressed    -      5,346,816     
Compression ratio    .44x

Wow, it's less than 1/2. The archive logs for compressed data is about double what they are for uncompressed.

Finally let's take a look at the Total Change Backup size.

Compressed        -     42197504
Uncompressed    -     43046400
Compression ratio    1x

UPDATES - The daily backup size for updates is about the same for both compressed data and uncompressed data.

SUMMARY.


Implementing ACO does have a large number of benefits. One of which is decreasing the size of a full backup. When implementing TDE, this can help mitigate the loss of compression in your backup strategy.
However . If you have a high change rate, and a long retention window, the backups may end up being the same size as they were before, and could possibly be bigger. This is especially relevant in a backup strategy that includes deduplication/incremental merge/virtual fulls.