Showing posts with label encryption. Show all posts

Wednesday, September 16, 2026

Oracle 19c: Cloning Encrypted PDBs and Moving TDE Keys

Oracle TDE master key in a wallet or Oracle Key Vault protects keys for encrypted tablespaces and columns
Oracle TDE key hierarchy. This walkthrough uses file-based wallets in Oracle Database 19c.

When cloning or refreshing an encrypted pluggable database (PDB) in Oracle Database 19c, it is easy to focus on the datafiles. Restore the backup, recover the database, and plug the PDB into the destination container database (CDB).

But don't forget the keys. With Transparent Data Encryption (TDE), the destination also needs access to the master encryption keys stored in the source wallet.

In this post I will walk through two ways to bring the keys with an encrypted PDB, and then show where those steps fit when the PDB is restored from backup. I am using Oracle Database 19c, local file-based TDE wallets, and united mode. In united mode the PDBs use the CDB's wallet, while keeping their own master encryption keys.

This builds on my posts about encrypting an Oracle PDB with TDE and Oracle wallet files for TDE and authentication.

NOTE: These are command examples to adapt and validate on your 19c Release Update. Database names, paths, passwords, and the recovery SCN are placeholders. This is a walkthrough of the key handling, not output from a completed lab.

For unplug/plug, I can bring the keys with ENCRYPT USING and DECRYPT USING, or export and import them separately. A refresh from RMAN backups also needs the historical keys during recovery into the auxiliary CDB.

In this post: Check the wallet · Unplug/plug with keys · Export and import keys · Refresh from RMAN backups · Rekey and verify · Merge wallets

TDE wallet keys: what needs to move with a PDB?

TDE has two levels of keys. The tablespace key encrypts the data, and the TDE master encryption key protects that key. The master key is stored in the keystore. Copying encrypted datafiles does not, by itself, give a different CDB access to that master key. Oracle's TDE overview

Moving an encrypted PDB and its TDE wallet keysThe encrypted PDB datafiles move to the destination PDB. Master keys are transported or exported and imported into the destination wallet, retaining its existing PDB keys.An encrypted PDB has two things to carryOracle Database 19c • Local TDE wallet • United modeSource PDBEncrypted datafilesProtected tablespace keysDestination PDBCopied datafilesStill encryptedCopy / restore / plugSource CDB walletPDB master encryption keysCurrent + historical keysDestination CDB walletImported PDB keysRetain existing PDB keysTransport with the PDBOR export / importAfter import: rekey the new PDB, verify encrypted data, and back up the updated wallet.A new master key does not remove the need for keys used by older backups.Figure 1. Move both the encrypted PDB datafiles and the required master keys into the destination environment.

For these examples I am using the following names.

Name Purpose
PRODCDB / APPPDB Source CDB and encrypted PDB
AUXCDB / APPPDB Temporary CDB used for a restore from backup
TESTCDB / APP_REFRESH Existing destination CDB and the new refresh PDB
SourceWalletPassword Password for the source wallet
TargetWalletPassword Password for the destination wallet
TransportSecret Separate secret protecting keys during transport

The transport secret and the wallet passwords have different jobs. I do not need to make the source and destination wallet passwords match.

STEP #1 - Check the TDE wallet configuration

On each CDB, I first check the configuration and wallet status.

-- SQL*Plus, connected to the appropriate CDB root
SHOW CON_NAME
SHOW PARAMETER wallet_root
SHOW PARAMETER tde_configuration

SELECT con_id, status, wallet_type, keystore_mode,
       wrl_parameter
FROM   v$encryption_wallet
ORDER BY con_id;

The examples assume TDE_CONFIGURATION='KEYSTORE_CONFIGURATION=FILE', with the united wallet under WALLET_ROOT/tde. A PDB row should show UNITED; the root can show NONE. An OPEN wallet is a useful first check, but it does not prove that it contains every key needed for this refresh. Wallet status reference

For a password wallet that is closed, open it from the root. Use the password belonging to that CDB.

ADMINISTER KEY MANAGEMENT SET KEYSTORE OPEN
  IDENTIFIED BY "SourceWalletPassword"
  CONTAINER = ALL;

If auto-login already has the wallet open, check its state rather than blindly repeating the open. The key-management examples below use FORCE KEYSTORE where supported to allow access to the password wallet. Have the ewallet.p12 password available even when normal database startup uses cwallet.sso. Configuring TDE

I also record the source PDB's keys before the move.

ALTER SESSION SET CONTAINER = APPPDB;

SELECT key_id, creation_time, activation_time
FROM   v$encryption_keys
ORDER BY activation_time;

This gives me key identifiers to compare later. I am recording metadata here, not displaying the secret key material. Encryption key view

Run the key operations as an appropriately privileged key administrator (SYSKM or ADMINISTER KEY MANAGEMENT), and the PDB operations with the necessary database privileges. The examples assume both are available to the administrative session.

METHOD #1 - Unplug and plug an encrypted PDB with its TDE keys

For a planned unplug/plug, I can protect the PDB's keys with a transport secret as part of the unplug operation.

1) Unplug on the source

-- PRODCDB root; source wallet must be open
ALTER SESSION SET CONTAINER = CDB$ROOT;

ALTER PLUGGABLE DATABASE APPPDB CLOSE IMMEDIATE;

ALTER PLUGGABLE DATABASE APPPDB
  UNPLUG INTO '/secure_stage/apppdb.xml'
  ENCRYPT USING "TransportSecret";

ENCRYPT USING protects the transported keys. The XML file is a manifest; the PDB's datafiles still have to be made available on the destination host. A .pdb archive is an alternative packaging format. Unplugging PDBs

NOTE: Unplugging takes this source PDB out of service. For a refresh that must leave production running, use the backup/auxiliary workflow below and unplug the restored copy.

2) Check compatibility at the destination

For this example, the XML and datafiles are accessible at the paths recorded in the XML. If the files were staged at different paths, account for that with SOURCE_FILE_NAME_CONVERT; FILE_NAME_CONVERT controls the destination copies.

-- TESTCDB root
SET SERVEROUTPUT ON
DECLARE
  can_plug BOOLEAN;
BEGIN
  can_plug := DBMS_PDB.CHECK_PLUG_COMPATIBILITY(
    pdb_descr_file => '/secure_stage/apppdb.xml',
    pdb_name       => 'APP_REFRESH');
  IF can_plug THEN
    DBMS_OUTPUT.PUT_LINE('Compatible');
  ELSE
    RAISE_APPLICATION_ERROR(-20001,
      'Review PDB_PLUG_IN_VIOLATIONS before continuing');
  END IF;
END;
/

Resolve compatibility errors before creating the PDB, including applicable patch, component, and character-set issues. Plug compatibility check

3) Plug in the copy

The destination wallet must already exist and be open. APP_REFRESH must be a new PDB name in TESTCDB.

-- TESTCDB root; filesystem paths used for this example
CREATE PLUGGABLE DATABASE APP_REFRESH AS CLONE
  USING '/secure_stage/apppdb.xml'
  COPY
  FILE_NAME_CONVERT =
    ('/u02/oradata/PRODCDB/APPPDB/',
     '/u02/oradata/TESTCDB/APP_REFRESH/')
  KEYSTORE IDENTIFIED BY "TargetWalletPassword"
  DECRYPT USING "TransportSecret";

ALTER PLUGGABLE DATABASE APP_REFRESH OPEN;

Here, AS CLONE gives the plugged copy a new identity, and COPY creates its datafiles at the destination. DECRYPT USING supplies the transport secret, while KEYSTORE IDENTIFIED BY supplies the destination wallet password. Adapt file placement for OMF or ASM. CREATE PLUGGABLE DATABASE reference

Finish with the rekey and verification steps below. An initial restricted open is not the end of the process.

METHOD #2 - Export and import TDE keys for an Oracle 19c PDB

This is an alternative to Method #1. I use a separate export file when I want the key transfer to be an explicit step in the refresh process.

1) Export from inside the source PDB

-- PRODCDB, or AUXCDB after restoring the PDB
ALTER SESSION SET CONTAINER = APPPDB;

ADMINISTER KEY MANAGEMENT EXPORT ENCRYPTION KEYS
  WITH SECRET "TransportSecret"
  TO '/secure_stage/apppdb_keys.exp'
  FORCE KEYSTORE
  IDENTIFIED BY "SourceWalletPassword";

ALTER SESSION SET CONTAINER = CDB$ROOT;
ALTER PLUGGABLE DATABASE APPPDB CLOSE IMMEDIATE;
ALTER PLUGGABLE DATABASE APPPDB
  UNPLUG INTO '/secure_stage/apppdb.xml';

Export inside the PDB. Do not add a WITH IDENTIFIER IN filter: a PDB export carries its keys and the metadata identifying the active key. Protect the export file and deliver its secret separately. Exporting keys leaves the source keys in place. Key export syntax

2) Import into the destination root before plugging, when required

If SYSTEM, SYSAUX, UNDO, or TEMP is encrypted, first import into TESTCDB's root. Then import again inside the new PDB to associate the keys with it. For a PDB without those encrypted system tablespaces, the pre-plug root import can be skipped. Oracle's united-mode PDB procedure

-- TESTCDB root: conditional pre-plug import
ALTER SESSION SET CONTAINER = CDB$ROOT;

ADMINISTER KEY MANAGEMENT IMPORT ENCRYPTION KEYS
  WITH SECRET "TransportSecret"
  FROM '/secure_stage/apppdb_keys.exp'
  FORCE KEYSTORE
  IDENTIFIED BY "TargetWalletPassword"
  WITH BACKUP USING 'before_refresh_root_import';

3) Plug in, open the PDB wallet, and import inside the PDB

Run the compatibility check from Method #1 first. This manifest was created without ENCRYPT USING, so this branch does not use DECRYPT USING.

-- TESTCDB root
CREATE PLUGGABLE DATABASE APP_REFRESH AS CLONE
  USING '/secure_stage/apppdb.xml'
  COPY
  FILE_NAME_CONVERT =
    ('/u02/oradata/PRODCDB/APPPDB/',
     '/u02/oradata/TESTCDB/APP_REFRESH/')
  KEYSTORE IDENTIFIED BY "TargetWalletPassword";

ALTER SESSION SET CONTAINER = APP_REFRESH;

-- If the PDB's password wallet is not already open:
ADMINISTER KEY MANAGEMENT SET KEYSTORE OPEN
  FORCE KEYSTORE
  IDENTIFIED BY "TargetWalletPassword";

ALTER SESSION SET CONTAINER = CDB$ROOT;
ALTER PLUGGABLE DATABASE APP_REFRESH OPEN;

ALTER SESSION SET CONTAINER = APP_REFRESH;

ADMINISTER KEY MANAGEMENT IMPORT ENCRYPTION KEYS
  WITH SECRET "TransportSecret"
  FROM '/secure_stage/apppdb_keys.exp'
  FORCE KEYSTORE
  IDENTIFIED BY "TargetWalletPassword"
  WITH BACKUP USING 'before_refresh_pdb_import';

The PDB may initially open restricted. Complete the PDB import, rekey, and reopen before releasing it to the application. The root import and PDB import serve different purposes; do not treat the root import as completion of both steps.

Refresh an encrypted PDB from RMAN backups

I separate this into two handoffs: backup to auxiliary CDB, followed by auxiliary PDB to the existing destination CDB.

Oracle 19c encrypted PDB refresh from RMAN backupsRestore the source backups into AUXCDB with the historical wallet keys. Then plug the restored PDB into TESTCDB and add its keys to the existing destination wallet.Refreshing from backup into an existing CDBRestore with the historical keys first. Then transfer the restored PDB and its keys.Source backup setRoot + seed + APPPDBControlfile + required redoChosen recovery SCNAUXCDB / APPPDBBackup-based duplicateRecover and openProduction keeps runningTESTCDBNew PDB: APP_REFRESHPlug in, rekey, and verifyCut over after validationSource wallet copyRequired root and PDB keysIncludes historical keysAuxiliary walletAvailable during recoveryUsed to export restored keysTESTCDB walletAdd APPPDB keysRetain other PDB keysRecoveryPlug-inTwo separate key handoffs1 Provision the recovery wallet to AUXCDB.2 Use ENCRYPT / DECRYPT, or a PDB key export / import, for TESTCDB.Figure 2. A backup refresh has two key handoffs: recovery into AUXCDB, then plug-in and key transfer into TESTCDB.

1) Make the historical keys available to the auxiliary

The auxiliary needs the keys required by the backup and recovery interval. Rotating the production master key does not eliminate the need for older keys. A wallet backup that predates a required rotation may be missing a key; a later wallet can contain the historical keys if they have been retained. TDE key history

For a newly prepared auxiliary, securely provision a copy of the source password wallet at its configured WALLET_ROOT/tde location. Use a wallet with the required CDB and PDB key history, not just a PDB key export. The duplicate also restores root and seed files. Keep the auxiliary's wallet separate from the live source and from TESTCDB's wallet. Preparing the auxiliary keystore

For example, the auxiliary initialization settings include:

db_name='AUXCDB'
db_unique_name='AUXCDB'
enable_pluggable_database=TRUE
wallet_root='/u01/app/oracle/admin/AUXCDB/wallet'
tde_configuration='KEYSTORE_CONFIGURATION=FILE'

This is only the relevant parameter excerpt. Prepare the auxiliary in NOMOUNT, with its own controlfile, datafile, redo, and recovery-area destinations, plus the password file and Oracle Net configuration required by your duplication method.

2) Restore the PDB into the temporary CDB

Here is a backup-based duplication example, with RMAN connected to PRODCDB as TARGET and AUXCDB as AUXILIARY. Both connections are to the root. The source backup pieces must be accessible to the auxiliary, including root, seed, PDB, controlfile, and the archived redo needed to reach the chosen SCN.

-- RMAN: connected to the two CDB roots
SET DECRYPTION WALLET OPEN
  IDENTIFIED BY 'SourceWalletPassword';

RUN {
  SET UNTIL SCN 123456789;
  SET NEWNAME FOR DATABASE TO '/u02/oradata/AUXCDB/%U';

  DUPLICATE TARGET DATABASE TO AUXCDB
    PLUGGABLE DATABASE APPPDB
    LOGFILE
      GROUP 1 ('/u02/oradata/AUXCDB/redo01.log') SIZE 200M,
      GROUP 2 ('/u02/oradata/AUXCDB/redo02.log') SIZE 200M,
      GROUP 3 ('/u02/oradata/AUXCDB/redo03.log') SIZE 200M;
}

Replace the SCN and file layout with values for your restore. This creates a new auxiliary CDB containing the selected PDB, not a PDB directly inside TESTCDB. Oracle 19c's DUPLICATE PLUGGABLE DATABASE ... TO existing_cdb form supports active duplication; it is not the backup-based command used here. RMAN DUPLICATE reference

SET DECRYPTION WALLET OPEN supplies the wallet password across auxiliary restarts during duplication. It does not transfer missing keys. If the backup pieces have a separate password-encryption layer, also supply the applicable backup password using SET DECRYPTION IDENTIFIED BY. That password does not replace the keys needed for the TDE-encrypted datafiles. RMAN SET reference

3) Transfer from AUXCDB into TESTCDB

After successful recovery and opening the restored PDB, use either Method #1 or Method #2, with AUXCDB as the source.

Create a fresh manifest from the restored PDB, and export its keys there if using Method #2. Update FILE_NAME_CONVERT to match the restored files' actual paths. In the RMAN example, %U generates filenames directly under /u02/oradata/AUXCDB/; inspect those filenames rather than assuming an APPPDB subdirectory exists.

I would create APP_REFRESH alongside the current test PDB, validate it, and then handle the application/service cutover. The destructive replacement of an existing PDB is a separate decision. This is a repeated refresh from backups, not a REFRESH MODE clone.

Rekey the cloned PDB, reopen, and verify

Once the imported keys are available, create and activate a destination master key inside APP_REFRESH.

-- TESTCDB, inside the new PDB only
ALTER SESSION SET CONTAINER = APP_REFRESH;

ADMINISTER KEY MANAGEMENT SET KEY
  FORCE KEYSTORE
  IDENTIFIED BY "TargetWalletPassword"
  WITH BACKUP USING 'app_refresh_rekey'
  CONTAINER = CURRENT;

ALTER SESSION SET CONTAINER = CDB$ROOT;
ALTER PLUGGABLE DATABASE APP_REFRESH CLOSE IMMEDIATE;
ALTER PLUGGABLE DATABASE APP_REFRESH OPEN;

Use CONTAINER=CURRENT for this PDB; there is no reason for a refresh to rotate every PDB's key. Changing the wallet password is also a different operation from generating a new master key. Key-management operations

Rekeying gives the destination a new master key. It does not make historical backups independent of their original keys. Retain those keys for as long as the corresponding recovery requirements exist. TDE key architecture FAQ

Now I check the result.

-- TESTCDB root
SELECT name, open_mode, restricted
FROM   v$pdbs
WHERE  name = 'APP_REFRESH';

SELECT time, name, cause, type, message, status, action
FROM   pdb_plug_in_violations
WHERE  name = 'APP_REFRESH'
AND    status <> 'RESOLVED'
ORDER BY time;

ALTER SESSION SET CONTAINER = APP_REFRESH;

SELECT status, keystore_mode, fully_backed_up
FROM   v$encryption_wallet;

SELECT key_id, creation_time, activation_time
FROM   v$encryption_keys
ORDER BY activation_time;

SELECT tablespace_name, encrypted
FROM   dba_tablespaces
ORDER BY tablespace_name;

I want READ WRITE, RESTRICTED=NO, and all blocking plug-in violations resolved. I also read known application data from an encrypted tablespace and check the expected refresh timestamp or business totals. Opening the PDB alone is not my application validation. Completing a PDB plug-in

Finally, back up the updated destination wallet and the refreshed PDB. WITH BACKUP protects the wallet before a change; I also want a retained copy containing the newly created key.

-- TESTCDB root, after successful rekey
ALTER SESSION SET CONTAINER = CDB$ROOT;

ADMINISTER KEY MANAGEMENT BACKUP KEYSTORE
  USING 'after_app_refresh'
  FORCE KEYSTORE
  IDENTIFIED BY "TargetWalletPassword"
  TO '/secure_wallet_backups/TESTCDB';

Keep password-wallet backups and their passwords recoverable, with access controlled separately from the database backups. An auto-login wallet stored beside encrypted backups weakens that separation. RMAN encryption and wallet backup guidance

Migrate TDE wallet keys with MERGE KEYSTORE

For one PDB, I would normally use the PDB export/import above. A wallet merge has broader scope: it adds the source wallet's keys to another wallet.

Here is a merge example using staged wallet copies, outside the live wallet directories:

-- Optional wallet administration example; not a PDB refresh step
ADMINISTER KEY MANAGEMENT
  MERGE KEYSTORE '/secure_stage/source_wallet'
    IDENTIFIED BY "SourceWalletPassword"
  INTO EXISTING KEYSTORE '/secure_stage/target_wallet_copy'
    IDENTIFIED BY "TargetWalletPassword"
  WITH BACKUP USING 'before_wallet_merge';

This updates the staged destination password wallet and leaves the source unchanged. It does not switch the live database to that staged wallet. A planned wallet migration must also configure the final location, reopen the merged wallet, and update or recreate its auto-login companion as appropriate. Coordinate that change across all consumers of the wallet. Merging and relocating wallets

NOTE: Do not copy the source ewallet.p12 over the wallet of an existing destination CDB. That destination may need keys for other PDBs. Also, MOVE KEYS removes selected keys from the source keystore and is not a substitute for a clone's export/import. MIGRATE USING is for changing the keystore provider, such as migrating to Oracle Key Vault. Key-management SQL reference

The operational check I would add to every refresh job is simple: record which backup was restored, which keys were supplied, where the destination wallet was backed up, and whether encrypted application data was successfully read. Those four items make the next refresh, and the next recovery exercise, much easier to review.

Sunday, September 29, 2024

ZDLRA backups -- How do I know if they are Encrypted

 The ZDLRA introduced a new feature with release 23.1 that can both encrypt backups (if they are not already encrypted from TDE) and  compress the backups .  The combing of both encryption and compression with this feature is unique to the ZDLRA.


I talked about this new exciting feature in a blog post on Oracle.com you can find here.

What I am am going to cover in this blog post is how to audit the RMAN catalog on the ZDLRA to validate that your backups are completely RMAN encrypted.

There are two big advantages of ensuring your backups are fully encrypted

1) With the prevalence of data exfiltration, and the advent of new regulations in many industries,  full encryption of backups is mandatory

2) When sending a backup to the Oracle cloud (either in OCI or to object storage on ZFS) full encryption is required to protect the backup data.

The question I often get asked with this feature is..

 "How do you tell  if your backups are encrypted ?"

You can can determine that your backups are encrypted by looking at the RMAN catalog.

The RC_BACKUP_PIECE view contains a column identifying if the backup is encrypted.  This column is set to "YES" only when the backup piece is encrypted.

Keep in mind that there multiple types of backups pieces contained in the catalog

  • Controlfile backups
  • Spfile backups
  • Archive log sweeps
  • Archive log backups from real-time redo
  • Datafile backups
  • Virtual Full backups created from incremental backups.
All of these backups except for two are sent from RMAN with "encryption on" and the backup set will marked as encrypted based on the RMAN encryption setting.

The two that are not set by RMAN directly are
  • Real-time redo backups. Real-time redo backups are identified in the RMAN catalog as encrypted when the destination setting on the protected database has ENCRYPTION=ENABLE set.
  • Virtual Full backups.  Virtual full backups are identified, for each datafile backup set, as encrypted ONLY after a new L0 is taken with RMAN encryption on, and all subsequent L1 backups are encrypted.  I know that is a lot of stipulations on identifying the virtual full backup as encrypted.  Only when a new FULL encrypted backup is taken, and all future incremental backups are encrypted can the ZDLRA be sure the backup has remained completely encrypted.

Checking the catalog

  The script below takes 2 parameters (&db_name, and &days_to_compare) and it will check the RMAN catalog and display the status of the backups, by backup type making it easier to identify any backup pieces that may not be encrypted.


This provides a nicely formatted output as you can see below.

                                             Database backup summary for last 15 days database: DBSG23AI

Encrypted  Compressed Backup
 Yes or No  Yes or No pieces Backup piece type
========== ========== ====== ========================================
YES        YES            69  Full backup
YES        NO             39 Archive Log - log sweep
NO         YES             1 Incremental L1  backup
YES        NO           3958 Archive Log - real-time redo
YES        YES            67 Incremental L1  backup
NO         YES             3  Full backup
NO         NO              1 Controlfile/SPFILE backup
YES        NO             26 Controlfile/SPFILE backup
YES        NO            221 Incremental L1  backup


In the report you can see that there a  few backups that not encrypted, along with some controlfile/spfile backups.


NOTE: In order to run this report, I created a REPORT user in the database on the ZDLRA as an "monitor" user.. A report has enough permissions to create this report.

OKV and ZDLRA 

Previously when sending backups to Cloud (which included OCI object storage on ZFSSA), OKV was required. When using Space Efficient Encrypted backups, you can ensure that EVERY backup piece is fully encrypted and RMAN recognizes them as encrypted.

If you follow the information in the blog, and what I have posted in the past, you will no longer need to configure OKV when sending backups to the cloud. 

If all backup pieces are encrypted, and the RMAN catalog reports that all backup are encrypted, you can create backups using DBMS_RA.CREATE_ARCHIVAL_BACKUP setting the "encryption_algorithm" to "CLIENT" or "ENC_CLIENT". This will tell the ZDLRA not utilize OKV to encrypt backups, but if any backup pieces are NOT encrypted, the archival backups will fail.


Friday, May 31, 2024

ZDLRA's space efficient encrypted backups with TDE explained

 In this post I will explain what typically happens  when RMAN either compresses, or encrypts backups and how the new space efficient encrypted backup feature of the ZDLRA solves these issues.


TDE - What does a TDE encrypted block look like ?

Oracle Block contents

In the image above you can see that only the data is encrypted with TDE.  The header information (metadata) remains unencrypted.  The metadata is used by the database to determine the information about the block, and is used by the ZDLRA to create virtual full backups.


Normal backup of TDE encrypted datafiles

First let's go through what happens when TDE is utilized, and you perform a RMAN backup of the database.

In the image below, you can see that the blocks are written and are not changed in any way. 

NOTE: Because the blocks are encrypted, they cannot be compressed outside of the database.  


TDE backup no compression

Compressed backup of TDE encrypted datafiles

Next let's go through what happens if you perform an RMAN backup of the database AND tell RMAN to create compressed backupsets.  As I said previously, the encrypted data will not compress., and because the data is TDE the backup must remain encrypted.
Below you can see that RMAN handles this with series of steps.  

RMAN will
  1. Decrypt the data in the block using the tablespace encryption key.
  2. Compress the data in block (it is unencrypted in memory).
  3. Re-encrypt the whole block (including the headers) using a new encryption key generated by the RMAN job

You can see in the image below, after executing two RMAN backup jobs the blocks are encrypted with two different encryption keys. Each subsequent backup job will also have new encryption keys.

Compressed TDE data


Compression or Deduplication

This leaves you with having to chose one or the other when performing RMAN backup jobs to a deduplication appliance.  If you execute a normal RMAN backup, there is no compression available, and if you utilize RMAN compression, it is not possible to dedupe the data. The ZDLRA, since it needs to read the header data, didn't support using RMAN compression.

How space efficient encrypted backups work with TDE

So how does the ZDLRA solve this problem to be able provide both compression and the creation of virtual full backups?
The flow is similar to using RMAN compression, BUT instead of using RMAN encryption, the ZDLRA library encrypts the blocks in a special format that leaves the header data unencrypted.  The ZDLRA library only encrypts the data contents of blocks.

  1. Decrypt the data in the block using the tablespace encryption
  2. Compress the data in block (it is unencrypted in memory).
  3. Re-encrypt the data portion of the block (not the headers) using a new encryption key generated by the RMAN job
In the image below you can see the flow as the backup is migrating to utilizing this feature.  The newly backed up blocks are encrypted with a new encryption key with each RMAN backup, and the header is left clear for the ZDLRA to still create a virtual full backup.

This allows the ZDLRA to both compress the blocks AND provide space efficient virtual full backups


How space efficient encrypted backups work with non-TDE blocks


So how does the ZDLRA feature work with non-TDE data ?
The flow is similar to that of TDE data, but the data does not have to be unencrypted first.  The blocks are compressed using RMAN compression, and are then encrypted using the new ZDLRA library.


In the image below you can the flow as the backup is migrating to utilizing this feature.  The newly backed up blocks are encrypted with a new encryption key with each RMAN backup, and the header is left clear for the ZDLRA to still create a virtual full.


I hope this helps to show you how space efficient encrypted backups work, and how it is a much more efficient way to both protect you backups with encryption, and utilize compression.

NOTE: using space efficient encrypted backups does not require with the ACO or the ASO options.


Tuesday, January 9, 2024

RMAN create standby database - Restore or Duplicate ?

RMAN create standby database - Are you like me and use "restore database" for large databases, or like most people (based on my Linkedin poll) and use "duplicate for standby"? 

The table below shows you the 3 main differences between the 2 methods.


This post started with a discussion within my team around which method you use. I, being of the "restore database" camp, didn't realize how commonly used "duplicate for standby" is. 
I have also dug through the documentation, and there is no common method that is mentioned. Even the 21c documentation for creating a standby database doesn't mention using the duplicate command.
I also was pointed to a MOS note that goes through creating a standby directly from the primary across multiple nodes, and with encryption.  Creating a Physical Standby database using RMAN restore database from service (Doc ID 2283978.1)

Well in this post, I will explain why "restore database" has been my preference. 

NOTE : If you are creating a standby database that is encrypted and the source database is not (creating a standby database in OCI for example) then I have instructions at the end of this post for how to use "Restore Database" to create a hybrid standby database.

Duplicate database for standby


From the poll I ran, this is the most common way to create a standby database.  It is probably the simplest way also because a lot of the configuration of the standby database is done automatically as part of the automated process.
Below is the simplified steps to perform this process.

PRE work

  1. Create simple initfile on the standby host.  The real SPFILE will be brought over as part of the duplication process.  This may contain location parameters for datafiles and redo logs if different from the primary.
  2. Create directories on the standby host.  This includes the audit directory, and possibly the database file directories if they are different from the host.
  3. Startup nomount.

Duplicate 

The duplicate process automatically performs these major steps using the standby as an auxiliary instance.

  1.  Create an SPFILE. The process creates an SPFILE for the standby and sets parameters for the standby.
  2. Shutdown/Startup standby database. This will use the newly created SPFILE during the rest of the processing
  3. Restore backup controlfile for standby database. The controlfile for the standby database is put in place, and the spfile is updated to it's location
  4. Mount controlfile . Mount the controlfile that was restored
  5. Restore database . Restore the datafiles files for the CDB and PDBs to their new location on the standby
  6. Switch datafile . Uses the new location of the datafiles that were restored.
  7. Create standby redo logs.
  8. Set parameters for standby database. The parameters necessary to communicate with the primary database are set.
  9. Put standby in recover mode . By this time, you should have set the primary database to communicate with the standby database.

NOTES

If you noticed above, I highlighted the second step which forces a shutdown/startup of the standby database. Because of this step, it is not possible to use this method and restore across nodes in a RAC database.  This can cause the duplicate operation to take much longer for larger databases.
Then in step #5 you can see that the "Restore Database" is automatic in the processing and it is not possible to perform a "restore as encrypted" if you are migrating to OCI from a non-TDE database.  The duplicate process does support "restore as encrypted", but only for creating a new Database, not a standby database.

Restore Database


This is the method that I've always used.  There is no automation, but it gives you much more control over the steps.  

PRE work

  1. Restore copy of prod SPFILE to standby host.  For this process, it doesn't matter if it is an intifile or spfile.  In this file you set all the parameters that are needed for the standby database to communicate with the primary and store datafiles/logfiles in the correct location.
  2. Create directories on the standby host.  This includes the audit directory, and possibly the database file directories if they are different from the host.
  3. Startup nomount.
  4. Create copy of primary controlfile for standby. This will be used for the standby database, and should contain the backup catalog  of the primary database, and the RMAN settings including the  channel definitions.
  5. Copy standby controlfile to standby host. The controlfile is copied to the standby host, and may be put in ASM at this point. Ensure the spfile points to the controlfile (and/or srvctl).
  6. Alter database mount.  Mount the controlfile. 
  7. Start up ALL nodes in the RAC cluster in mount mode.  This will allow you to restore the database across ALL nodes in the RAC cluster, and include all the networking from these nodes.  For a large database hosted on multiple DB nodes this can make a HUGE difference when restoring the database.
  8. Create (or copy) TDE wallet.  If the standby database is going to be TDE, then include the wallet if the primary is TDE, or create a new wallet and key if the standby database is going to be TDE.

Restore Database 

The restore process is a manual process

  1.  RMAN Connect to database (and possibly RMAN catalog). Connect to the database and make sure you have access to the backups. For ZDLRA this may mean connecting to the RMAN catalog.
  2. Restore Database (as encrypted). This will restore the database to the new location.  With Restore Database, the database can be encrypted during the restore operation.  With 19c it is supported to have the standby database be encrypted without the primary database being encrypted (Hybrid dataguard).
  3. Switch datafile . Uses the new location of the datafiles that were restored.
  4. Recover database. This will use the archive logs that are cataloged to bring the standby database forward
  5. Create standby redo logs.
  6. Set parameters for standby database. The parameters necessary to communicate with the primary database are set.
  7. Put standby in recover mode . By this time, you should have set the primary database to communicate with the standby database.


NOTES

With the restore database, there are 2 sections I highlighted and these are the advantages that I love about using this method.
  • RMAN is restoring across multiple nodes in a RAC cluster which can make the restore operation much faster.
  • Restore as encrypted allows you take a database that may have TDE partially implemented, or not implemented and create a new standby database that is encrypted. With the duplicate method, TDE would have to be implemented separately.
If you are restoring a VERY large database (200 TB for example) that was not TDE from object storage to the Exadata Cloud Service, both of these advantages can make a HUGE difference when creating a standby database.

Comparison

The chart below compares the the differences between "Duplicate Database" and "Restore Database".

WARNING: When using a ZDLRA for backups, it is NOT recommended to use the "Restore Database" to clone a database as a new copy. Registering the restored copy can cause issues with the RMAN catalog because the "restore database" leaves entries in the RC_SITE table.


Data Guard Hybrid Cloud Configuration

The ability to create a hybrid cloud configuration was introduced in Version 19.16 and there is a great blog post from Glen Hawkins explaining this feature.
This feature allows you have your Primary database remain unencrypted (no ASO license), but still have the standby database in OCI be TDE encrypted.

In this section I want to talk about how you can use "Restore Database as Encrypted" to implement this configuration quickly.

If you want to implement this feature using "Duplicate for standby" you have to separately encrypt the datafiles once they are restored in OCI.  This can be done online, or offline, but it is still a time consuming task.

Prepare the primary and future standby databases

The first step is prepare the primary database and future standby database by creating a wallet file and setting encryption keys.  There is a great video put together by Peter Wahl (PM for TDE and OKV) that goes through a lot of the steps.

Below is a summary of the steps you need to perform.  You can follow along the steps in Peter's video and I will point out where in the video you will find each step.

  • Create the directories on the primary (3:40) -  Directories are specified in the video and need to be created on all nodes in a RAC cluster.
  • Create the directories on the standby database (4:18) -Directories are specified in the video and need to be created on all nodes in a RAC cluster.
  • Set the wallet_root in the primary (4:25) - This is set in the SPFILE only
  • Set tablespace_encryption to decrypt_only on primary (4:40) -  This is set in the SPFILE only
  • Set the default algorithm to AES256 on primary (4:50) - This is set in the SPFILE only
  • Set wallet_root on standby, tablespace_encryption to auto_enable, and default algorithm on standby --  This is set in the initfile that you create prior to performing the restore.  This step is different from the video because there is no standby at this point.
  • Bounce the primary database (5:50) - This can be in a rolling manner.
  • Create a password protected wallet on the primary (7:25) - This gets created in the default location specified from WALLET_ROOT
  • Create an auto open wallet on the primary (7:30) - This will make it automatically open for the database.
  • Set the encryption keys in the primary (7:40) - The keys will be created so that they can be used when restoring the datafiles on the standby database.
  • Copy the wallets from the primary to the standby (7:55) - This provides the standby database with the keys to encrypt.


Thursday, September 21, 2023

ZFS storing encryption keys in Oracle Key Vault (OKV)

 ZFS can be configured to use Oracle Key Vault (OKV)  as a KMIPs cluster to store it's encryption keys. In this blog post I will go through how to configure my ZFS replication pair to utilize my OKV cluster and take advantage of the Raw Crypto Replication mode introduced in 8.8.57.


OKV Cluster Environment:

First I am going to describe the environment I am using for my OKV cluster.

I have 2 OKV servers, OKVEAST1 ( IP:10.0.4.230)  and OKVEAST2 (IP: 10.0.4.254). These OKV servers are both running 21.6 (the current release as of writing this post).


ZFS replication Pair:

For my ZFS pair, I am using a pair of ZFS hosts that I have been running for awhile.  My first ZFS host is "testcost-a" (IP: 10.0.4.45)  and my second ZFS host is "zfs_s3"( IP: 10.0.4.206).  Both of these servers are running the 8.8.60 release.

For my replication, I already have "testcost-a" configured as my upstream, and "zfs_s3" configured as the downstream.

Steps to configure encryption using OKV

Documentation:

The documentation I am using to configure ZFS can be found in the 8.8.x Storage Administrators guide.  I did look through the documentation for OKV, and I didn't find anything specific that needs to be done when using OKV as a KMIP server.

Step #1 - Configure endpoints/wallets in OKV

The first step is to create 2 endpoints in OKV and assign a shared wallet between these 2 endpoints. 

 I am starting by creating a single wallet that I am going to use share the encryption keys between my 2 ZFS replication pairs.  I


The next step after creating the wallet is to create the 2 endpoints. Each ZFS host is an endpoint. Below is the screenshot for adding the first node.


After creating both endpoints I see them in the OKV console.


Then I click on each endpoint and ensure that 

  • The default wallet for each endpoint is the "ZFS_ENCRYPTION_KEYS" wallet
  • The endpoint has the ability to manage this wallet.


Then I go back to endpoint list in the console and save the "enrollment token" for each node and logout.

Server                    Enrollment Token

ZFS_S3        FdqkaimSpCUBfVqV

TESTCOST-A         uy59ercFNjBisU12

I then go to the main screen for OKV and click on the enrollment token download


Enter the Enrollment Token and click on "Submit Token"


You see that the token is validated. Then click on Enroll and it will download the token "okvclient.jar" which I am renaming to okvclient_{zfs server}.zip.  This will allow me to extract the certificates.

When completed, I have enrolled the endpoints and I am ready to add them to the ZFS.


Step #2 - Add the Certificates 

When I look at the .jar files that were created for the endpoints I can see all the files that are included in the endpoint enrollment. I need to add the certificates to the ZFS servers.  I can find those in the "ssl" directory contained in .jar file.


I start by uploading the "key.pem" for my first ZFS "testcost-a" in the Configuration=>SETTINGS=>Certificates=>System section of the BUI.


After uploading it I then add the "cert.pem" certificate in system also.


After uploading, I clicked in the pencil to see the details for the certificate.  

NOTE: The IP Address is the primary node in my OKV cluster.

Under Certificates=>Trusted I uploaded the CA.pem certificate.


After uploading this certificate, I click on the pencil and select "kmip" identifying this certificate to be used for the KMIP service.


The certificate should now appear as a trusted KMIP services certificate.


I can now upload the certificates for my other ZFS server (zfs_s3) the same way.


Step #3 - Add the OKV/KMIP service

I now navigate to the Shares=>ENCRYPTION=>KMIP section of the BUI to add the KMIP servers to my first ZFS host.  Because I have 2 possible KMIP servers (I am using an OKV cluster), I am going to uncheck the "Match Hostname against certificate subject" button.  I left the default to destroy the key when removing it from the ZFS.

I added the 2 OKV servers (if I had a more than 2 nodes in my cluster I would add those nodes also).  I added the port used for KMIP services on OKV (5696), and I chose the "Client TLS Authentication Certificate" I uploaded in the previous step (FLxULFbeMO).


I perform the same process on my second ZFS so that the paired ZFS servers are all configured to communicate with my OKV cluster to provide KMIP services.

NOTE: If you want to get the list of OKV hosts in the cluster you can look in the .jar file within the conf=>install.cfg file to see the OKV servers details. Below is the contents of my file.


Once I add the KMIP configuration to both of my ZFS servers I can look at my endpoints in OKV and see that they are both ENROLLED, and that OKV knows the IP address of my ZFS servers.


Step #4 - Add one or more keys.

On my upstream ZFS, I click on the "+" to add a new key and save it.


After adding it, the key appears in this section.


Step #5 - Add the keys to the shared wallet

I noticed that even though the wallet is the default wallet for the endpoints, the key did not get added to the wallet. I can see that both nodes have access to manage the wallet.


I clicked on the wallet, and then the "Add Contents", from there I am adding my new key to the wallet.


And now I login into the second ZFS (zfs_s3) and add the same key.  Make sure you add the same named key on the second ZFS so that they can match.

Step #6 - Create a new encrypted project/share

On my first ZFS (upstream - testcost-a) I am creating a new project and share that is encrypted using the key from the KMIP service.


Then within the share, I configure replication to my paired ZFS.
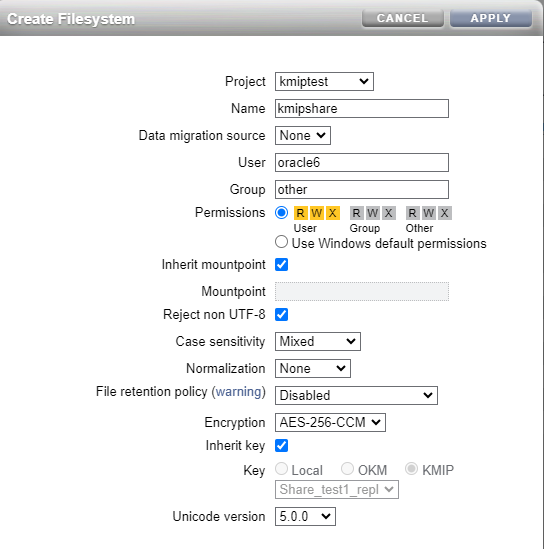
And now I am creating a share within this project.


Step #7 - Configure replication

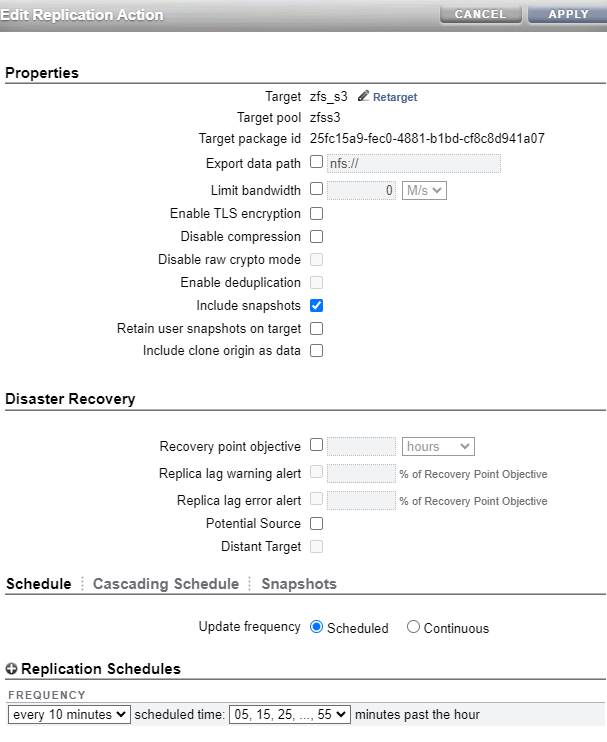
Finally I configured replication from my project in my upstream (testcost-a) to my downstream (zfs_s3).  Below are the settings for my replication processing to send a snapshot every 10 minutes.  Notice that I made sure that I did NOT disable raw Crypto Mode (which is what I am using for this replication).  You can follow this link to learn more about Raw Crypto Replication.


Result:


I now have replication on my encrypted share working between my upstream and downstream.  With this new feature, the blocks are sent in their original encrypted format, and are stored on the downstream encrypted.  Since both ZFS servers can access the encryption key, both servers are able to decrypt the blocks.

I did test shutting down one of my OKV hosts, and found that the ZFS severs were able to successfully connect to the surviving node.

I even mounted the share, stored some files, replicated it, mounted a snapshot copy, and ensured that both ZFS servers presented the shares readable.