Wednesday, June 26, 2024

Using APEX to upload objects to ZFSSA

 When working on my latest project, I wanted to be able to provide an easy web interface that can be used to upload images into OCI object storage on ZFSSA by choosing the file on my local file system.

In this blog post, I will go through the series of steps I used to create a page in my APEX application that allows a user to choose a local file on their PC, and upload that file (image in my case) to OCI object storage on ZFSSA.


Below are the series of steps I followed.


Configure ZFSSA as OCI object storage

First you need to configure your ZFSSA as OCI object storage.  Below are a couple of links to get you started.

During this step you will

  • Create a user on ZFSSA that will be be the owner of the object storage
  • Add a share that is owned by the object storage user
  • Enable OCI API mode "Read/Write" as the protocol for this share
  • Under the HTTP service enable the service and enable OCI.
  • Set the default path as the share.
  • Add a public key for the object storage user under "Keys" within the OCI configuration.

NOTE: You can find an example of how to create public/private key pair here.

Create a bucket in the OCI object storage on ZFSSA

In order to create a bucket in the OCI object storage you need to use the "OCI cli" interface.
If you have not installed it already, you can use this link for instructions on how to install it.

Once installed, you need to configure the ~/.oci/config file and I explain the contents in my "OCI access to ZFS" section of this blog post.

Now you should have the oci cli installed, and the configuration file created, and we are ready for the command to create the bucket.

oci os bucket create --endpoint http:{ZFSSA name or IP address} --namespace-name {share name} --compartment-id {share name} --name {bucket name}

For my example below:

Parameter value
ZFSSA name or IP address zfstest-adm-a.dbsubnet.bgrennvcn.oraclevcn.com
share name objectstorage
bucket name newobjects

The command to create my bucket would is:
oci os bucket create --endpoint http://zfstest-adm-a.dbsubnet.bgrennvcn.oraclevcn.com --namespace-name objectstorage --compartment-id objectstorage --name newobjects


Ensure you have the authentication information for APEX

This step is to make sure you have what you need for APEX in order to configure and upload an object into object storage on ZFSSA.

If you successfully created a bucket in the last step, you should have everything you need in the configuration file that you used.  Looking at the contents of my config file (below) I have almost all the parameters I need for APEX.

From the step above I have the correct  URL to access the object storage and the bucket.

http://{ZFSSA name or IP address}/n/{share name}/b/{bucket name}/o/

which becomes

http://zfstest-adm-a.dbsubnet.bgrennvcn.oraclevcn.com/n/objectstorage/newobjects/o/

The rest of the information except for tenancy is in the configuration file.

Parameter in config file value
user ocid1.user.oc1..{ZFS user} ==> ocid1.user.oc1..oracle 
fingerprint {my fingerprint} ==> 88:bf:b8:95:c0:0a:8c:a7:ed:55:dd:14:4f:c4:1b:3e
key_file This file contains the private key, and we will use this in APEX
region This is always us-phoenix-1 and is 
namespace share name ==> objectstorage
compartment
share name ==> objectstorage


NOTE: The tenancy ID for ZFSSA is always  "ocid1.tenancy.oc1..nobody"


In APEX configure web credentials

Now that we have all of the authentication information outlined in the previous step, we need to configure web credentials to access the OCI object storage on ZFSSA as a rest service.

In order to add the web credentials I log into my workspace in APEX. Note I am added the credentials at the workspace level rather than at the application level.
Within your workspace make sure you are within the "App Builder" section and click on "Workspace Utilities". 


Within "Workspace Utilities" click on "web Credentials".


Now click on "Create >" to create new web credential


Enter the information below (also see screen shot)

  • Name of credential
  • Type is OCI
  • user Id from above
  • private key from above
  • Tenancy ID is always ocid1.tenancy.oci1..nobody for ZFSSA
  • Fingerprint that matches the public/private key
  • URL for the ZFS


In apex create the upload region and file selector

I have an existing application, or you can create a new application in apex. I am going to start by creating a blank page in my application.


After clicking on "Next >", I give the new page a name and create the page.


Then on the new page I created a new region by right clicking on "Body"


Once I created the region, I named the region "upload" by changing the identification on the right hand side of Page Designer.


Then on the left hand side of Page Designer, I right clicked on my region "upload" and chose to create a new "Page Item".


After creating the new page item I needed to give the item a better identification name and change the type to "file upload". See the screen shot below.


In apex create the Button to submit the file to be stored in object storage.


Next we need to add a button to upload the file to object storage.  Right click on the "upload" region, and this time choose "create button below".


I gave the button a clearer name to identify what it's there for


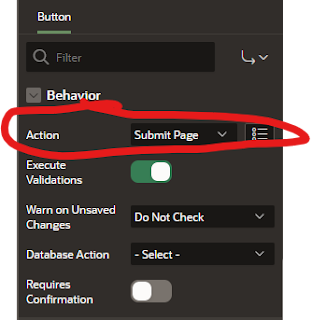
And I scrolled down the attributes of the button on the right hand side, and made sure that the behavior for the button was "Submit Page"


In apex add the upload process itself

Click on the processing section in the top left corner of Page Designing and you will see the sections for page process.  Right click on "Processing" and click on "Create process"


The next step is to give the process a better identifier, and I named my "file_upload", and I also need to include the PL/SQL code to execute as part of this process.

The items we need to customer for the code snippet are.

ITEM VALUE
File Browse Page Item ":" followed by the name of the file selector. Mine is ":FILE_NAME"
Object Storage URL This is the whole URL including namespace and bucket name
Web Credentials This is the name for the Web Credentials created for the workspace


My PL/SQL code is below with the values I've mentioned throughout this blog.


declare
    l_request_url varchar(32000);
    l_content_length number;
    l_response clob;
    upload_failed_exception exception;
    l_request_object blob;
    l_request_filename varchar2(500);
    begin
        select blob_content, filename into l_request_object, l_request_filename from apex_application_temp_files where name = :FILE_NAME;
        l_request_url := 'http://zfstest-adm-a.dbsubnet.bgrennvcn.oraclevcn.com/n/objectstorage/b/newobjects/o/' || apex_util.url_encode(l_request_filename);        
l_response := apex_web_service.make_rest_request(
            p_url => l_request_url,
            p_http_method => 'PUT',
            p_body_blob => l_request_object,
            p_credential_static_id => 'ZFSAPI'
        );end;


In the APEX database ensure you grant access to the URL

The final step before we test this is to add the ACL grant for the URL.
NOTE: This needs to be granted to to the apex application owner, in my case APEX_230200

BEGIN
    DBMS_NETWORK_ACL_ADMIN.APPEND_HOST_ACE(
        host => '*',
        ace => xs$ace_type(privilege_list => xs$name_list('connect', 'resolve'),
            principal_name => 'APEX_230200',
            principal_type => xs_acl.ptype_db
        )
    );
END;
/


Upload the object and verify it was successful

After saving the page in Page Designer run the page to upload an object.
Choose an object from your local file system and click on the "Upload Object" button.

If there were no errors, it was successful and you can verify it was uploaded by listing the objects in the bucket.
Below is my statement to list the objects.

oci os object list --endpoint http://zfstest-adm-a.dbsubnet.bgrennvcn.oraclevcn.com  --namespace-name objectstorage --bucket-name newobjects


 That's all there is to it

Friday, May 31, 2024

ZDLRA's space efficient encrypted backups with TDE explained

 In this post I will explain what typically happens  when RMAN either compresses, or encrypts backups and how the new space efficient encrypted backup feature of the ZDLRA solves these issues.


TDE - What does a TDE encrypted block look like ?

Oracle Block contents

In the image above you can see that only the data is encrypted with TDE.  The header information (metadata) remains unencrypted.  The metadata is used by the database to determine the information about the block, and is used by the ZDLRA to create virtual full backups.


Normal backup of TDE encrypted datafiles

First let's go through what happens when TDE is utilized, and you perform a RMAN backup of the database.

In the image below, you can see that the blocks are written and are not changed in any way. 

NOTE: Because the blocks are encrypted, they cannot be compressed outside of the database.  


TDE backup no compression

Compressed backup of TDE encrypted datafiles

Next let's go through what happens if you perform an RMAN backup of the database AND tell RMAN to create compressed backupsets.  As I said previously, the encrypted data will not compress., and because the data is TDE the backup must remain encrypted.
Below you can see that RMAN handles this with series of steps.  

RMAN will
  1. Decrypt the data in the block using the tablespace encryption key.
  2. Compress the data in block (it is unencrypted in memory).
  3. Re-encrypt the whole block (including the headers) using a new encryption key generated by the RMAN job

You can see in the image below, after executing two RMAN backup jobs the blocks are encrypted with two different encryption keys. Each subsequent backup job will also have new encryption keys.

Compressed TDE data


Compression or Deduplication

This leaves you with having to chose one or the other when performing RMAN backup jobs to a deduplication appliance.  If you execute a normal RMAN backup, there is no compression available, and if you utilize RMAN compression, it is not possible to dedupe the data. The ZDLRA, since it needs to read the header data, didn't support using RMAN compression.

How space efficient encrypted backups work with TDE

So how does the ZDLRA solve this problem to be able provide both compression and the creation of virtual full backups?
The flow is similar to using RMAN compression, BUT instead of using RMAN encryption, the ZDLRA library encrypts the blocks in a special format that leaves the header data unencrypted.  The ZDLRA library only encrypts the data contents of blocks.

  1. Decrypt the data in the block using the tablespace encryption
  2. Compress the data in block (it is unencrypted in memory).
  3. Re-encrypt the data portion of the block (not the headers) using a new encryption key generated by the RMAN job
In the image below you can see the flow as the backup is migrating to utilizing this feature.  The newly backed up blocks are encrypted with a new encryption key with each RMAN backup, and the header is left clear for the ZDLRA to still create a virtual full backup.

This allows the ZDLRA to both compress the blocks AND provide space efficient virtual full backups


How space efficient encrypted backups work with non-TDE blocks


So how does the ZDLRA feature work with non-TDE data ?
The flow is similar to that of TDE data, but the data does not have to be unencrypted first.  The blocks are compressed using RMAN compression, and are then encrypted using the new ZDLRA library.


In the image below you can the flow as the backup is migrating to utilizing this feature.  The newly backed up blocks are encrypted with a new encryption key with each RMAN backup, and the header is left clear for the ZDLRA to still create a virtual full.


I hope this helps to show you how space efficient encrypted backups work, and how it is a much more efficient way to both protect you backups with encryption, and utilize compression.

NOTE: using space efficient encrypted backups does not require with the ACO or the ASO options.


Wednesday, April 17, 2024

Autonomous Recovery Service Prechecks

 If you are configuring backups to utilize the Autonomous Recovery Service, there are some prerequisites that you need to be aware of.  If your Oracle Database was originally created in OCI and has always been OCI, those prerequisites are already configured for your database.  But, if you migrated a database to an OCI service, you might not realize that these items are required.


Prerequisites for Autonomous Recovery Service


1) WALLET_ROOT must be configured in the SPFILE.

WALLET_ROOT is a new parameter that was added in 19c, and its purpose is to replace the SQLNET.ENCRYTPION_WALLET_LOCATION in the sqlnet.ora file. Configuring the encryption wallet location in the sqlnet.ora file is depreciated.
WALLET_ROOT points to the directory path on the DB node(s) where the encryption wallet is stored for this database, and possibly the OKV endpoint client if you are using OKV to manage your encryption keys.
WALLET_ROOT allows each database to have it's own configuration location specific to each database.

There is a second parameter that goes with WALLET_ROOT that tells the database what kind of wallet is used (file, HSM or OKV), and that parameter is tde_configuration.


Running the script below should return the WALLET_ROOT location, and the tde_configuration information.


Checking the WALLET_ROOT and tde_configuration


Below you can see that both of these parameters are configured and I am using a wallet file.


Parameter            Value
-------------------- ------------------------------------------------------------
wallet_root          /var/opt/oracle/dbaas_acfs/bgrenndb/wallet_root
tde_configuration    keystore_configuration=FILE


If you need to migrate to WALLET_ROOT use the tooling .

dbaascli tde enableWalletRoot - enable wallet_root spfile parameter for existing database.

           Usage: dbaascli tde enableWalletRoot --dbname <value> [--dbRestart <value>] [--executePrereqs] [--resume [--sessionID <value>]]
                     Where:
                          --dbname - Oracle database name.
                          [--dbRestart - database restart option. Valid values : full|rolling ]
                          [ --executePrereqs - run the prerequisite checks and report the results. ]
                          [--resume - to resume the previous operation]
                          [--sessionID - to resume a specific session id.]


2) Encryption keys must be configured and available

In order to leverage the Autonomous Recovery Service, you must have an encryption key set and available for the CDB and each PDB.  If you migrated a non-TDE database (or plugged in a nonTDE PDB) to OCI you might not have configured encryption for one ore more PDBs.  The next step is to ensure that you have an encryption key set, and the wallet is open.  The query below should return "OPEN" for each CDB/PDB showing that the encryption key is available.


Below is the output from the query showing that the wallet is open for the CDB and the PDBs. 


   INST_ID PDB Name   Type       WRL_PARAMETER                                                Status
---------- ---------- ---------- ------------------------------------------------------------ ---------------
         1 BGRENNPDB1 FILE                                                                    OPEN
           CDB$ROOT   FILE       /var/opt/oracle/dbaas_acfs/bgrenndb/wallet_root/tde/         OPEN
           PDB$SEED   FILE                                                                    OPEN

         2 BGRENNPDB1 FILE                                                                    OPEN
           CDB$ROOT   FILE       /var/opt/oracle/dbaas_acfs/bgrenndb/wallet_root/tde/         OPEN
           PDB$SEED   FILE                                                                    OPEN


3) All tablespaces are TDE encrypted

TDE encryption is mandatory in OCI, and the Autonomous Recovery Service cannot be used if all of your tablespaces are not encrypted.  Below is a query to run that will tell you if your tablespaces are all encrypted.


In my case I can see that all of the tablespaces are encrypted

Encrypted tablespace information
------------------------------------------------------------
Number of encrypted tablespaces   :      12
Number of unencrypted tablespaces :      0
                                         ----
Total Number of tablespaces       :      12


To find any tablespaces that are not encrypted you can run the query below.


4) Turn Off Any Manual Operational Backups.


In some cases, OCI users perform manual operational backups. These backups are run outside the standard tooling and support point-in-time recovery (non-KEEP backups).
Performing incremental backups to multiple locations can cause integrity issues with recovery.
The original backups can be kept to support the original retention window, and ensure that you have operational backups for a point-in-time prior to onboarding to the Recovery Service.  
Choose an appropriate cutover time, and switch to the Recovery Service, and slowly remove older backups as they expire until they are all completely removed.