Thursday, September 21, 2023

ZFS storing encryption keys in Oracle Key Vault (OKV)

 ZFS can be configured to use Oracle Key Vault (OKV)  as a KMIPs cluster to store it's encryption keys. In this blog post I will go through how to configure my ZFS replication pair to utilize my OKV cluster and take advantage of the Raw Crypto Replication mode introduced in 8.8.57.


OKV Cluster Environment:

First I am going to describe the environment I am using for my OKV cluster.

I have 2 OKV servers, OKVEAST1 ( IP:10.0.4.230)  and OKVEAST2 (IP: 10.0.4.254). These OKV servers are both running 21.6 (the current release as of writing this post).


ZFS replication Pair:

For my ZFS pair, I am using a pair of ZFS hosts that I have been running for awhile.  My first ZFS host is "testcost-a" (IP: 10.0.4.45)  and my second ZFS host is "zfs_s3"( IP: 10.0.4.206).  Both of these servers are running the 8.8.60 release.

For my replication, I already have "testcost-a" configured as my upstream, and "zfs_s3" configured as the downstream.

Steps to configure encryption using OKV

Documentation:

The documentation I am using to configure ZFS can be found in the 8.8.x Storage Administrators guide.  I did look through the documentation for OKV, and I didn't find anything specific that needs to be done when using OKV as a KMIP server.

Step #1 - Configure endpoints/wallets in OKV

The first step is to create 2 endpoints in OKV and assign a shared wallet between these 2 endpoints. 

 I am starting by creating a single wallet that I am going to use share the encryption keys between my 2 ZFS replication pairs.  I


The next step after creating the wallet is to create the 2 endpoints. Each ZFS host is an endpoint. Below is the screenshot for adding the first node.


After creating both endpoints I see them in the OKV console.


Then I click on each endpoint and ensure that 

  • The default wallet for each endpoint is the "ZFS_ENCRYPTION_KEYS" wallet
  • The endpoint has the ability to manage this wallet.


Then I go back to endpoint list in the console and save the "enrollment token" for each node and logout.

Server                    Enrollment Token

ZFS_S3        FdqkaimSpCUBfVqV

TESTCOST-A         uy59ercFNjBisU12

I then go to the main screen for OKV and click on the enrollment token download


Enter the Enrollment Token and click on "Submit Token"


You see that the token is validated. Then click on Enroll and it will download the token "okvclient.jar" which I am renaming to okvclient_{zfs server}.zip.  This will allow me to extract the certificates.

When completed, I have enrolled the endpoints and I am ready to add them to the ZFS.


Step #2 - Add the Certificates 

When I look at the .jar files that were created for the endpoints I can see all the files that are included in the endpoint enrollment. I need to add the certificates to the ZFS servers.  I can find those in the "ssl" directory contained in .jar file.


I start by uploading the "key.pem" for my first ZFS "testcost-a" in the Configuration=>SETTINGS=>Certificates=>System section of the BUI.


After uploading it I then add the "cert.pem" certificate in system also.


After uploading, I clicked in the pencil to see the details for the certificate.  

NOTE: The IP Address is the primary node in my OKV cluster.

Under Certificates=>Trusted I uploaded the CA.pem certificate.


After uploading this certificate, I click on the pencil and select "kmip" identifying this certificate to be used for the KMIP service.


The certificate should now appear as a trusted KMIP services certificate.


I can now upload the certificates for my other ZFS server (zfs_s3) the same way.


Step #3 - Add the OKV/KMIP service

I now navigate to the Shares=>ENCRYPTION=>KMIP section of the BUI to add the KMIP servers to my first ZFS host.  Because I have 2 possible KMIP servers (I am using an OKV cluster), I am going to uncheck the "Match Hostname against certificate subject" button.  I left the default to destroy the key when removing it from the ZFS.

I added the 2 OKV servers (if I had a more than 2 nodes in my cluster I would add those nodes also).  I added the port used for KMIP services on OKV (5696), and I chose the "Client TLS Authentication Certificate" I uploaded in the previous step (FLxULFbeMO).


I perform the same process on my second ZFS so that the paired ZFS servers are all configured to communicate with my OKV cluster to provide KMIP services.

NOTE: If you want to get the list of OKV hosts in the cluster you can look in the .jar file within the conf=>install.cfg file to see the OKV servers details. Below is the contents of my file.


Once I add the KMIP configuration to both of my ZFS servers I can look at my endpoints in OKV and see that they are both ENROLLED, and that OKV knows the IP address of my ZFS servers.


Step #4 - Add one or more keys.

On my upstream ZFS, I click on the "+" to add a new key and save it.


After adding it, the key appears in this section.


Step #5 - Add the keys to the shared wallet

I noticed that even though the wallet is the default wallet for the endpoints, the key did not get added to the wallet. I can see that both nodes have access to manage the wallet.


I clicked on the wallet, and then the "Add Contents", from there I am adding my new key to the wallet.


And now I login into the second ZFS (zfs_s3) and add the same key.  Make sure you add the same named key on the second ZFS so that they can match.

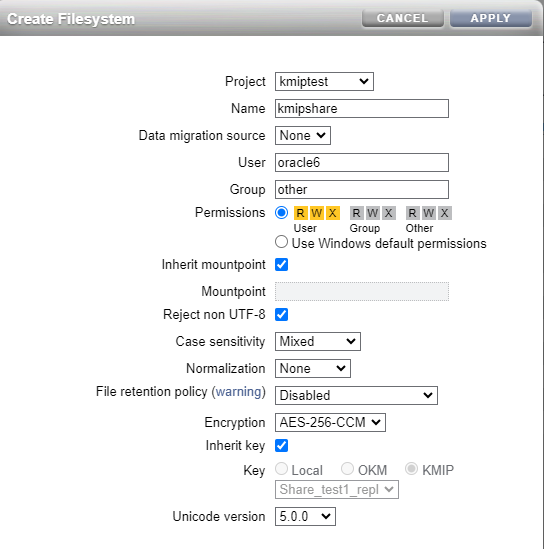
Step #6 - Create a new encrypted project/share

On my first ZFS (upstream - testcost-a) I am creating a new project and share that is encrypted using the key from the KMIP service.


Then within the share, I configure replication to my paired ZFS.
And now I am creating a share within this project.


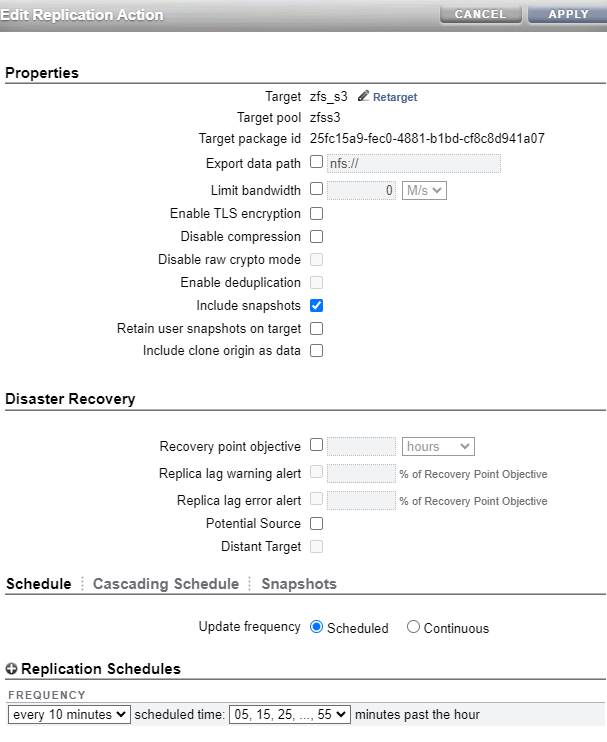
Step #7 - Configure replication

Finally I configured replication from my project in my upstream (testcost-a) to my downstream (zfs_s3).  Below are the settings for my replication processing to send a snapshot every 10 minutes.  Notice that I made sure that I did NOT disable raw Crypto Mode (which is what I am using for this replication).  You can follow this link to learn more about Raw Crypto Replication.


Result:


I now have replication on my encrypted share working between my upstream and downstream.  With this new feature, the blocks are sent in their original encrypted format, and are stored on the downstream encrypted.  Since both ZFS servers can access the encryption key, both servers are able to decrypt the blocks.

I did test shutting down one of my OKV hosts, and found that the ZFS severs were able to successfully connect to the surviving node.

I even mounted the share, stored some files, replicated it, mounted a snapshot copy, and ensured that both ZFS servers presented the shares readable.

Tuesday, September 5, 2023

Creating dynamic KEEP archival backups from ZDLRA

 This post covers how to utilize the new package DBMS_RA.CREATE_ARCHIVAL_BACKUP to dynamically create KEEP archival backups from a ZDLRA.

When using this package to schedule KEEP backups, I recommend creating restore points with every incremental backup.  Read this blog post to find out why.

PROCEDURE CREATE_ARCHIVAL_BACKUP(
   db_unique_name IN VARCHAR2,
   from_tag IN VARCHAR2 DEFAULT NULL,
   compression_algorithm IN VARCHAR2 DEFAULT NULL,
   encryption_algorithm IN VARCHAR2 DEFAULT NULL,
   restore_point IN VARCHAR2 DEFAULT NULL,
   restore_until_scn      IN VARCHAR2 DEFAULT NULL,
   restore_until_time     IN TIMESTAMP WITH TIME ZONE DEFAULT NULL,
   attribute_set_name     IN VARCHAR2,
   format                 IN VARCHAR2 DEFAULT NULL,
   autobackup_prefix      IN VARCHAR2 DEFAULT NULL,
   restore_tag            IN VARCHAR2 DEFAULT NULL,
   keep_until_time        IN TIMESTAMP WITH TIME ZONE DEFAULT NULL,
   max_redo_to_apply      IN INTEGER DEFAULT 14                    --> Added in 21.1 June PSU
   comments IN VARCHAR2 DEFAULT NULL);

NOTE: This blog post was updated to include the MAX_REDO_TO_APPLY parameter which is not documented as of writing this post.

 The documentation can be found here.  

These archival KEEP backups can be sent to either

  • TAPE - Using the copy-to-tape process you can send archival backups to physical tape, virtual tape, or any media manager that uses a "TAPE" backup type.
  • CLOUD - Using the copy-to-cloud process you can send archival backups to an OCI object store bucket which can be either on a local ZFSSA (using the OCI API protocol), or to the Oracle Cloud directly.


NOTE: When sending backups to a cloud location, retention rules can be set on the bucket LOCKING the cloud backups to ensure that they are immutable.  This is integrated with the new compliance settings on the RA21.


How to use this package

1. Identify the Database

Because this is more of an on demand process, you have to execute the package for each database separately (rather than by using a protection policy), and identify for each database the point-in-time you want to use for recovery..

2. Set Archival Restore Point

Because the archival backup is dynamically created using existing backups the restore point works differently than if you create the KEEP backup on demand from the protected database. 


When you create a KEEP backup from the protected database, the backup contains 

    • Full backup of all datafiles
    • Backup of spfile and controlfile
    • Backup of archive logs created during the backup starting with a log switch at the beginning of the backup.
    • Final archive logs created by performing a log switch at the end of the backup.

 When you create an Archival backup from the ZDLRA , the backup contains

    • Most current virtual full backup of each datafile prior to the point in time for recovery that you choose. 
    • Backup of spfile and controlfile 
    • Backup of the active archive logs generated when the oldest virtual full datafile backup started, up to the archive logs needed to recover until the point in time chosen for recovery.

As you can see a normal KEEP backup generated by the protected database is a a "self-contained" backup that can be recovered only to the point in time that the backup completed.  You can increase the recover point by adding additional KEEP archival log backups after the backup.

The dynamically created KEEP backup generated by the ZDLRA is also a "self-contained" backup that can be recovered to any point in time after the last datafile backup completed, but it also includes any point in time up to the restore point identified.  

Choices for a dynamic restore point 

 There are 3 options to choose a specific restore point. If you do not set one of these options, the KEEP backup will be created using the current restore point of the database.  

  •  RESTORE_POINT - If you set a unique restore point in the database immediately following an incremental backup (or  at a later point in time), you can create a KEEP backup that will recover to that point-in-time.  When using this process, after creating the restore point you should ensure that you also perform a log switch, and a log sweep to backup the archive logs.  This restore point name is used as the default RESTORE_TAG, and should be unique.  The recommended name (because it is the default KEEP restore tag) is "<KEEP_BACKUP_><yyyyMMddHH24miSS>".  BUT- in order to better identify the restore point, I would use a shorter name that just contains the date (assuming you are only performing an single daily incremental backup), for example "KEEP_BACKUP_MMDDYY".  By using a restore point, you can better control the amount of archive logs necessarily to recover the database.


    • Incremental forever backups ensure that the duration of the backup is much shorter than a typical full KEEP backup limiting the amount of archive logs necessary to have a recovery point.
    • Setting a restore point immediately following the backup ensures that the recovery window following the last datafile backup piece is short also limiting the amount of archive logs necessary.

  • RESTORE_UNTIL_SCN or RESTORE_UNTIL_TIME I am grouping these 2 choices together, because they are so similar.  Unlike using a restore point that is preset, using either of these options will create the KEEP archive backup with a recover point as the SCN number given or the UNTIL TIME given (using the databases timezone). 


FROM_TAG - The documentation states that only backups containing the FROM_TAG will be considered if a FROM_TAG is set. I am thinking this would make sense if you let the restore point default to the current time, and you want to choose which backup pieces to include.  I am not sure of the full use of this option however.


WARNING: This process only looks back 14 days for a full backup to start the KEEP backupset with.  If you do not have a full backup within the 14 day window this can be over ridden with the  MAX_REDO_TO_APPLY parameter in the package call. This was added in the 21.1 June PSU to allow customers to set a window farther than 14 days.

 RECOMMENDATIONS 

  •  Because you can create up to 2048 RESTORE_POINTs in a database, and normal restore points are automatically dropped when necessary, I would recommend creating a restore point following each incremental backup with the format mentioned above, This will allow you to create a self-contained FULL KEEP backup from any incremental backup as needed. This can be used to easily create an end-of-month KEEP backup (for example).


  • I would use the RESTORE_UNTIL options when it is necessary to create a KEEP backup as of a specific point-in-time regardless of when the backup completed. This would be used if the recovery point is critical.

WARNING

Before creating the archival backup, ensure you have the archive logs backed up that are needed to support the recover point, and ensure there is enough time for the incremental backups to virtualize.  You many need perform a log switch and execute an additional log sweep prior to scheduling the archival backup.

3. Set Archival Options


COMPRESSION_ALGORITHM
-  The default is no compression, and if the backup piece is already compressed, it will not try to compress the backup again.  The documentation does a good job of going through the options, and why you would chose one or the other.  Keep in mind that if your database uses TDE for all the datafiles, there will be no gain with compression, and the extra resources required for compression may slow down the restore.  Also, the compression is performed by the ZDLRA (RMAN compression), but the de-compression is performed by the protected database during restore.

 ENCRYPTION_ALGORITHM - The default is no encryption, but it is important to understand that any copy-to-cloud processing MUST have encryption set.  It is also important to understand that the ZDLRA must be using OKV (Oracle Key Vault) to store the encryption keys when encryption is set. The list of algorithms can be found in the documentation.


4. Set Archival Location and Name

ATTRIBUTE_SET_NAME - This must be specified, and this identifies the backup location to send the archival backups.

FORMAT - By default the  backup pieces are given handles automatically generated by the ZDLRA, this setting allows you to change the default backup piece format using normal RMAN formatting options.

AUTOBACKUP_PREFIX - - By default the autobackup pieces will retain the original names, but  you can add a prefix to the original autobackup names. 


5. Set Restore TAG

 By default the RESTORE_TAG defaults to  "<KEEP_BACKUP_><yyyyMMddHH24miSS>". This can be overridden to give the backup a more meaningful tag. For example, the end-of-month backup could be tagged as "MONTHLY_12_2023", making it easier to automate finding specific KEEP backups.

 RECOMMENDATIONS 

I would set the Restore Tag to a set format that makes the KEEP backups easy to find. You can see the example above. 

6. Set KEEP_UNTIL time

The default KEEP_UNTIL time is "FOREVER". In most cases you want to set an end date for the backup, allowing the ZDLRA to automatically remove the backup when it expires.  This date-time is based on the timezone of the protected database. 


 SUMMARY 

 If using this functionality to dynamically create Archival KEEP backups...

  • I would set a Restore Point in each database immediately following every incremental backup.  
  • I would schedule this procedure to create the archival backup with a formatted restore tag to make the backup easy to find.
  • If backing up to a CLOUD location, I would use retention rules to ensure the backups are immutable until they expire.


Tuesday, August 8, 2023

How to clone a single PDB onto another DB host.

Cloning a single PDB isn't always easy to do, especially if you are trying to use an existing backup rather copying from an existing database.  In this blog post I will walk through how to restore a PDB from an existing Multi-tenant backup to another host, and plug it into another CDB.


My environment is:

DBCS database  FASTDB

        db_name                                  fastdb

        db_unique_name                     = fastdb_67s_iad

        DB Version                              = 19.19

        TDE                                         = Using local wallet 

        Backup                                    = Object Storage using the Tooling 

        RMAN catalog                        = Using RMAN catalog to emulate ZDLRA

        PDB name                              = fastdb_pdb1


Step #1 - Prepare destination

The first step is to copy over all the necessary pieces for restoring the database using the object store library.

  • TDE wallet
  • Tape Library
  • Tape Library config file
  • SEPS wallet used by backup connection
  • SPFILE contents to build a pfile
NOTE: When using a ZDLRA as a source you need to copy over the following pieces.
  • TDE wallet
  • ZDLRA library (or use the library in the $ORACLE_HOME)
  • SEPS wallet used by the channel allocation to connect to the ZDLRA
  • SPFILE contents to build a pfile

Also create any directories needed (like audit file location).
  • mkdir /u01/app/oracle/admin/fastdb_67s_iad/adump
I added the entry to the /etc/oratab file and changed my environment to point to this database name.

In my case I copied the following directories and subdirectories to the same destination on the host.
  • scp /opt/oracle/dcs/commonstore/wallets/fastdb_67s_iad/*
  • scp /opt/oracle/dcs/commonstore/oss/fastdb_67s_iad/*
Finally, I copied some of the contents in the spfile.  Below are the critical entries.
audit_file_dest='/u01/app/oracle/admin/fastdb_67s_iad/adump'
*.compatible='19.0.0.0'
*.control_files='+RECO/FASTDB_67S_IAD/CONTROLFILE/current.256.1143303659'
*.db_block_size=8192
*.db_create_file_dest='+DATA'
*.db_create_online_log_dest_1='+RECO'
*.db_domain='subnet.vcn.oraclevcn.com'
*.db_files=1024
*.db_name='fastdb'
*.db_recovery_file_dest='+RECO'
*.db_recovery_file_dest_size=8191g
*.db_unique_name='fastdb_67s_iad'
*.diagnostic_dest='/u01/app/oracle'
*.enable_pluggable_database=true
*.global_names=TRUE
*.log_archive_format='%t_%s_%r.dbf'
*.nls_language='AMERICAN'
*.nls_territory='AMERICA'
*.processes=4000
*.sga_target=4g
*.tde_configuration='keystore_configuration=FILE'
*.undo_retention=900
*.undo_tablespace='UNDOTBS1'
*.wallet_root='/opt/oracle/dcs/commonstore/wallets/fastdb_67s_iad'


Step #2 - Restore controlfile

The next step is to restore the controlfile to my destination host

I grabbed 2 pieces of information from the source database
  • DBID  - This is needed to restore the controlfile from the backup.
  • Channel configuration.
With this I executed the following to restore the controlfile.

startup nomount;
set dbid=1292000107;

 run
 {
 allocate CHANNEL sbt1 DEVICE TYPE  'SBT_TAPE' FORMAT   '%d_%I_%U_%T_%t' PARMS  'SBT_LIBRARY=/opt/oracle/dcs/commonstore/oss/fastdb_67s_iad/libopc.so ENV=(OPC_PFILE=/opt/oracle/dcs/commonstore/oss/fastdb_67s_iad/acefbba5-65ad-454c-b1fe-467dec1abde4/opc_fastdb_67s_iad.ora)';
 restore controlfile ;
 }

and below is my output.

RMAN>  run
 {
 allocate CHANNEL sbt1 DEVICE TYPE  'SBT_TAPE' FORMAT   '%d_%I_%U_%T_%t' PARMS  'SBT_LIBRARY=/opt/oracle/dcs/commonstore/oss/fastdb_67s_iad/libopc.so ENV=(OPC_PFILE=/opt/oracle/dcs/commonstore/oss/fastdb_67s_iad/acefbba5-65ad-454c-b1fe-467dec1abde4/opc_fastdb_67s_iad.ora)';
 restore controlfile ;
 }2> 3> 4> 5>

allocated channel: sbt1
channel sbt1: SID=1513 device type=SBT_TAPE
channel sbt1: Oracle Database Backup Service Library VER=19.0.0.1

Starting restore at 08-AUG-23

channel sbt1: starting datafile backup set restore
channel sbt1: restoring control file
channel sbt1: reading from backup piece c-1292000107-20230808-04
channel sbt1: piece handle=c-1292000107-20230808-04 tag=TAG20230808T122731
channel sbt1: restored backup piece 1
channel sbt1: restore complete, elapsed time: 00:00:01
output file name=+RECO/FASTDB_67S_IAD/CONTROLFILE/current.2393.1144350823
Finished restore at 08-AUG-23


Step #3 - Restore Datafiles for CDB and my PDB

Below is the commands I am going to execute to restore the datafiles for my CDB , my PDB and the PDB$SEED.

First I'm going to mount the database, and I am going to spool the output to a logfile.


alter database mount;

SPOOL LOG TO '/tmp/restore.log';
set echo on;

run { 
            restore database root ;
            restore database FASTDB_PDB1;
            restore database "PDB$SEED";
     }

I went through the output, and I can see that it only restored  the CDB , my PDB, and the PDB$SEED.


Step #4 - execute report schema and review file locations


List of Permanent Datafiles
===========================
File Size(MB) Tablespace           RB segs Datafile Name
---- -------- -------------------- ------- ------------------------
1    1040     SYSTEM               YES     +DATA/FASTDB_67S_IAD/DATAFILE/system.283.1144351313
3    970      SYSAUX               NO      +DATA/FASTDB_67S_IAD/DATAFILE/sysaux.284.1144351305
4    95       UNDOTBS1             YES     +DATA/FASTDB_67S_IAD/DATAFILE/undotbs1.280.1144351303
5    410      PDB$SEED:SYSTEM      NO      +DATA/FASTDB_67S_IAD/F9D6EA8CCAA09630E0530905F40A5107/DATAFILE/system.264.1143303695
6    390      PDB$SEED:SYSAUX      NO      +DATA/FASTDB_67S_IAD/F9D6EA8CCAA09630E0530905F40A5107/DATAFILE/sysaux.265.1143303695
7    50       PDB$SEED:UNDOTBS1    NO      +DATA/FASTDB_67S_IAD/F9D6EA8CCAA09630E0530905F40A5107/DATAFILE/undotbs1.266.1143303695
8    410      FASTDB_PDB1:SYSTEM   YES     +DATA/FASTDB_67S_IAD/017B7B0563F0410FE063A100000A1C63/DATAFILE/system.291.1144351333
9    410      FASTDB_PDB1:SYSAUX   NO      +DATA/FASTDB_67S_IAD/017B7B0563F0410FE063A100000A1C63/DATAFILE/sysaux.292.1144351331
10   70       FASTDB_PDB1:UNDOTBS1 YES     +DATA/FASTDB_67S_IAD/017B7B0563F0410FE063A100000A1C63/DATAFILE/undotbs1.281.1144351329
11   5        USERS                NO      +DATA/FASTDB_67S_IAD/DATAFILE/users.285.1144351303
12   5        FASTDB_PDB1:USERS    NO      +DATA/FASTDB_67S_IAD/017B7B0563F0410FE063A100000A1C63/DATAFILE/users.295.1144351329
13   420      RMANPDB:SYSTEM       YES     +DATA/FASTDB_67S_IAD/021D506D8C7ADC01E063A100000A8702/DATAFILE/system.285.1143999311
14   420      RMANPDB:SYSAUX       NO      +DATA/FASTDB_67S_IAD/021D506D8C7ADC01E063A100000A8702/DATAFILE/sysaux.282.1143999317
15   50       RMANPDB:UNDOTBS1     YES     +DATA/FASTDB_67S_IAD/021D506D8C7ADC01E063A100000A8702/DATAFILE/undotbs1.281.1143999323
16   5        RMANPDB:USERS        NO      +DATA/FASTDB_67S_IAD/021D506D8C7ADC01E063A100000A8702/DATAFILE/users.284.1143999309
17   100      RMANPDB:RMANDATA     NO      +DATA/FASTDB_67S_IAD/021D506D8C7ADC01E063A100000A8702/DATAFILE/rmandata.280.1144001911

List of Temporary Files
=======================
File Size(MB) Tablespace           Maxsize(MB) Tempfile Name
---- -------- -------------------- ----------- --------------------
1    20       TEMP                 32767       +DATA/FASTDB_67S_IAD/TEMPFILE/temp.263.1143304005
2    131      PDB$SEED:TEMP        32767       +DATA/FASTDB_67S_IAD/017B5DDEB84167ACE063A100000AD816/TEMPFILE/temp.267.1143303733
4    224      FASTDB_PDB1:TEMP     4095        +DATA/FASTDB_67S_IAD/017B7B0563F0410FE063A100000A1C63/TEMPFILE/temp.272.1143304235
6    224      RMANPDB:TEMP         4095        +DATA/FASTDB_67S_IAD/021D506D8C7ADC01E063A100000A8702/TEMPFILE/temp.283.1143999305


Step #5 - Determine tablespaces to skip during recovery

I ran this on my primary database, and used it to build the RMAN command. This command will get the names of the tablespaces that are not part of this PDB so that I can ignore them.


select '''' ||pdb_name||''':'||tablespace_name ||',' 
    from cdb_tablespaces a,
         dba_pdbs b
         where a.con_id=b.con_id(+)
         and b.pdb_name not in ('FASTDB_PDB1')
order by 1;

From the above, I built the script below that skips the tablespaces for the PDB "RMANPDB".


recover database skip forever tablespace 
'RMANPDB':RMANDATA,
'RMANPDB':SYSAUX,
'RMANPDB':SYSTEM,
'RMANPDB':TEMP,
'RMANPDB':UNDOTBS1,
'RMANPDB':USERS;
And then ran my RMAN script to recover my datafiles that were restored.
NOTE: the datafiles for my second PDB were "offline dropped"


Starting recover at 08-AUG-23
RMAN-06908: warning: operation will not run in parallel on the allocated channels
RMAN-06909: warning: parallelism require Enterprise Edition
allocated channel: ORA_DISK_1
channel ORA_DISK_1: SID=3771 device type=DISK
allocated channel: ORA_SBT_TAPE_1
channel ORA_SBT_TAPE_1: SID=4523 device type=SBT_TAPE
channel ORA_SBT_TAPE_1: Oracle Database Backup Service Library VER=19.0.0.1
channel ORA_SBT_TAPE_1: starting incremental datafile backup set restore
channel ORA_SBT_TAPE_1: specifying datafile(s) to restore from backup set
destination for restore of datafile 00001: +DATA/FASTDB_67S_IAD/DATAFILE/system.283.1144351313


...

Executing: alter database datafile 13, 14, 15, 16, 17 offline drop
starting media recovery

channel ORA_SBT_TAPE_1: starting archived log restore to default destination
channel ORA_SBT_TAPE_1: restoring archived log
archived log thread=1 sequence=26
channel ORA_SBT_TAPE_1: reading from backup piece FASTDB_1292000107_5m23a29f_182_1_1_20230808_1144326447
channel ORA_SBT_TAPE_1: piece handle=FASTDB_1292000107_5m23a29f_182_1_1_20230808_1144326447 tag=TAG20230808T122727
channel ORA_SBT_TAPE_1: restored backup piece 1
channel ORA_SBT_TAPE_1: restore complete, elapsed time: 00:00:01
archived log file name=+RECO/FASTDB_67S_IAD/ARCHIVELOG/2023_08_08/thread_1_seq_26.2389.1144352807 thread=1 sequence=26
channel default: deleting archived log(s)
archived log file name=+RECO/FASTDB_67S_IAD/ARCHIVELOG/2023_08_08/thread_1_seq_26.2389.1144352807 RECID=1 STAMP=1144352806
media recovery complete, elapsed time: 00:00:01
Finished recover at 08-AUG-23


Step #6 - Open database 

I opened the database and the PDB
SQL> alter database open;

Database altered.


SQL> alter pluggable database fastdb_pdb1 open;

Pluggable database altered.

SQL> show pdbs;

    CON_ID CON_NAME                       OPEN MODE  RESTRICTED
---------- ------------------------------ ---------- ----------
         2 PDB$SEED                       READ ONLY  NO
         3 FASTDB_PDB1                    READ ONLY  NO
         4 RMANPDB                        MOUNTED


I also went and updated my init{sid}.ora to point to the controlfile that I restored.


Step #8 - Create shell PDB in the tooling

I created a new PDB that is going to be the name of the PDB I am going to plug in.  This is optional.


Step #7 - Switch my restored database to be a primary database

I found that the database was considered a standby database, and I needed to make it a primary to unplug my pdb


SQL> RECOVER MANAGED STANDBY DATABASE FINISH;
Media recovery complete.
SQL> SELECT SWITCHOVER_STATUS FROM V$DATABASE;

SWITCHOVER_STATUS
--------------------
TO PRIMARY

SQL> alter database commit to switchover to primary with session shutdown;


Database altered.


Step #8 - unplug my PDB

I opened the database and unplugged my PDB.

SQL> alter database open;

Database altered.

SQL> alter pluggable database fastdb_pdb1 unplug into '/tmp/fastdb_pdb1.xml' ENCRYPT USING transport_secret;


Pluggable database altered.

SQL>
drop pluggable database fastdb_pdb1 keep datafiles;SQL>

Pluggable database dropped.


Step #9 - Drop the placeholder PDB from the new CDB

Now I am unplugging, and dropping the placeholder PDB.

SQL> show pdbs;

    CON_ID CON_NAME                       OPEN MODE  RESTRICTED
---------- ------------------------------ ---------- ----------
         2 PDB$SEED                       READ ONLY  NO
         3 LAST21C_PDB1                   READ WRITE NO
         4 CLONED_FASTDB                  READ WRITE NO
SQL> alter pluggable database CLONED_FASTDB close;

Pluggable database altered.


SQL> alter pluggable database CLONED_FASTDB unplug into '/tmp/CLONED_FASTDB.xml' ENCRYPT USING transport_secret;

Pluggable database altered.

SQL> drop pluggable database CLONED_FASTDB keep datafiles;

Pluggable database dropped.


Step #10 - Plug in the PDB and open it up


create pluggable database CLONED_FASTDB USING '/tmp/fastdb_pdb1.xml' keystore identified by W3lCom3#123#123 decrypt using transport_secret
NOCOPY
TEMPFILE REUSE;
SQL>   2    3

Pluggable database created.

SQL> SQL>alter pluggable database cloned_fastdb open;


That's it.  it took a bit to track down the instructions, but this all seemed to work.


Step #11 - Clone the PDB to ensure that the tooling worked

I next cloned the PDB to make sure the tooling properly recognized my PDB and it all worked fine. You can that I know have a second copy of the PDB (test_clone).